Showing posts with label guest post. Show all posts

Thursday, April 28, 2011

Easy Chocolate Tart with Pistachio with Me, My Food and I

Hi all!!


Do you miss me yet??


Well...things are going pretty slow around here. Little Butt and I have been sick for the last few days. We are fighting hard to get over it but it doesn't make it easy to unpack boxes when I have to stop every other minute to blow my nose. 


Even if you are missing me now, once you read today's post you won't even remember my name! LOL!!


Today I present to you: Michael from Me, My Food and I


I discovered Michael when he guest posted for Chef Dennis and I have never looked back. Michael is one of those kind and genuine people that you count yourself lucky to know. I'm so glad I've been able to get to know him better through our blogs and emails. 


Once you read this post you will understand my love and adoration for this fellow food blogger. And once you are done here, please jump over to his blog to say hi. 


Thanks for this delicious treat Michael!!! Give me a couple months and I will hop across the pond to have a chocolate martini with you...as long as you have one of these tarts waiting as well!


Hello readers of Jolts & Jollies! My name is Michael Toa. I am 23 and I live in Sunderland, UK. Like you, I also know and completely understand: there are times when only chocolate will do. In my life, I can only think of a few situations that cannot be conquered with chocolate. When I am down, a plateful of chocolate chips cookies and a glass of cold chocolate milk never fail to cheer me up; when I am feeling celebratory with friends, all I can think about is my flourless chocolate cake piled high with cream and berries; in a moment when I want to find calm, I turn to my favourite bar of dark chocolate; when I need to bribe work colleagues, I bake brownies; my chocolate mousse with Frangelico (hazelnut liquor) and raspberries creates the perfect mood for a romantic dinner date, and when I want to indulge, it’s got to be a chocolate tart...

Chocolate tart and I had a terribly flaky start, but I can assure you, we are now solid. I still often dread the thought of making pastry which sometimes can be a bit tricky. One day it occurred to me that chocolate tart doesn’t have to have a pastry base; I could also make it with a biscuit base which is much, much easier.

So, this is my stress-free, no-bake version of the good old chocolate tart. The tart is best when made in advance to give both the base and the filling time to set. It looks rather elegant for an afternoon tea or a dinner party. Just make sure you save an extra slice for yourself for moment of self-spoiling later... dark, crumbly, buttery base and creamy, velvety, chocolate mascarpone filling with crunchy pistachios. Who could resist? Not me.

I use bourbon biscuits here, but there’s nothing to stop you to use other chocolate crème filled sandwich cookies, like Oreos. You can also as easily alter the flavour here, both in the base and in the filling by adding your favourite pairings with chocolate, like orange zest, coffee or berries.

Feel free to use all dark chocolate if you’re feeling very sophisticated; or all milk chocolate if you fancy something really sweet, but I find combining the two chocolates together create such beautiful balance of flavours. Though I also think that’s just because I cannot decide and I am passionately greedy.

At last but not least, I also know there are times when only certain concoctions will do... but let’s keep this for some other time... chocolate martini anyone?
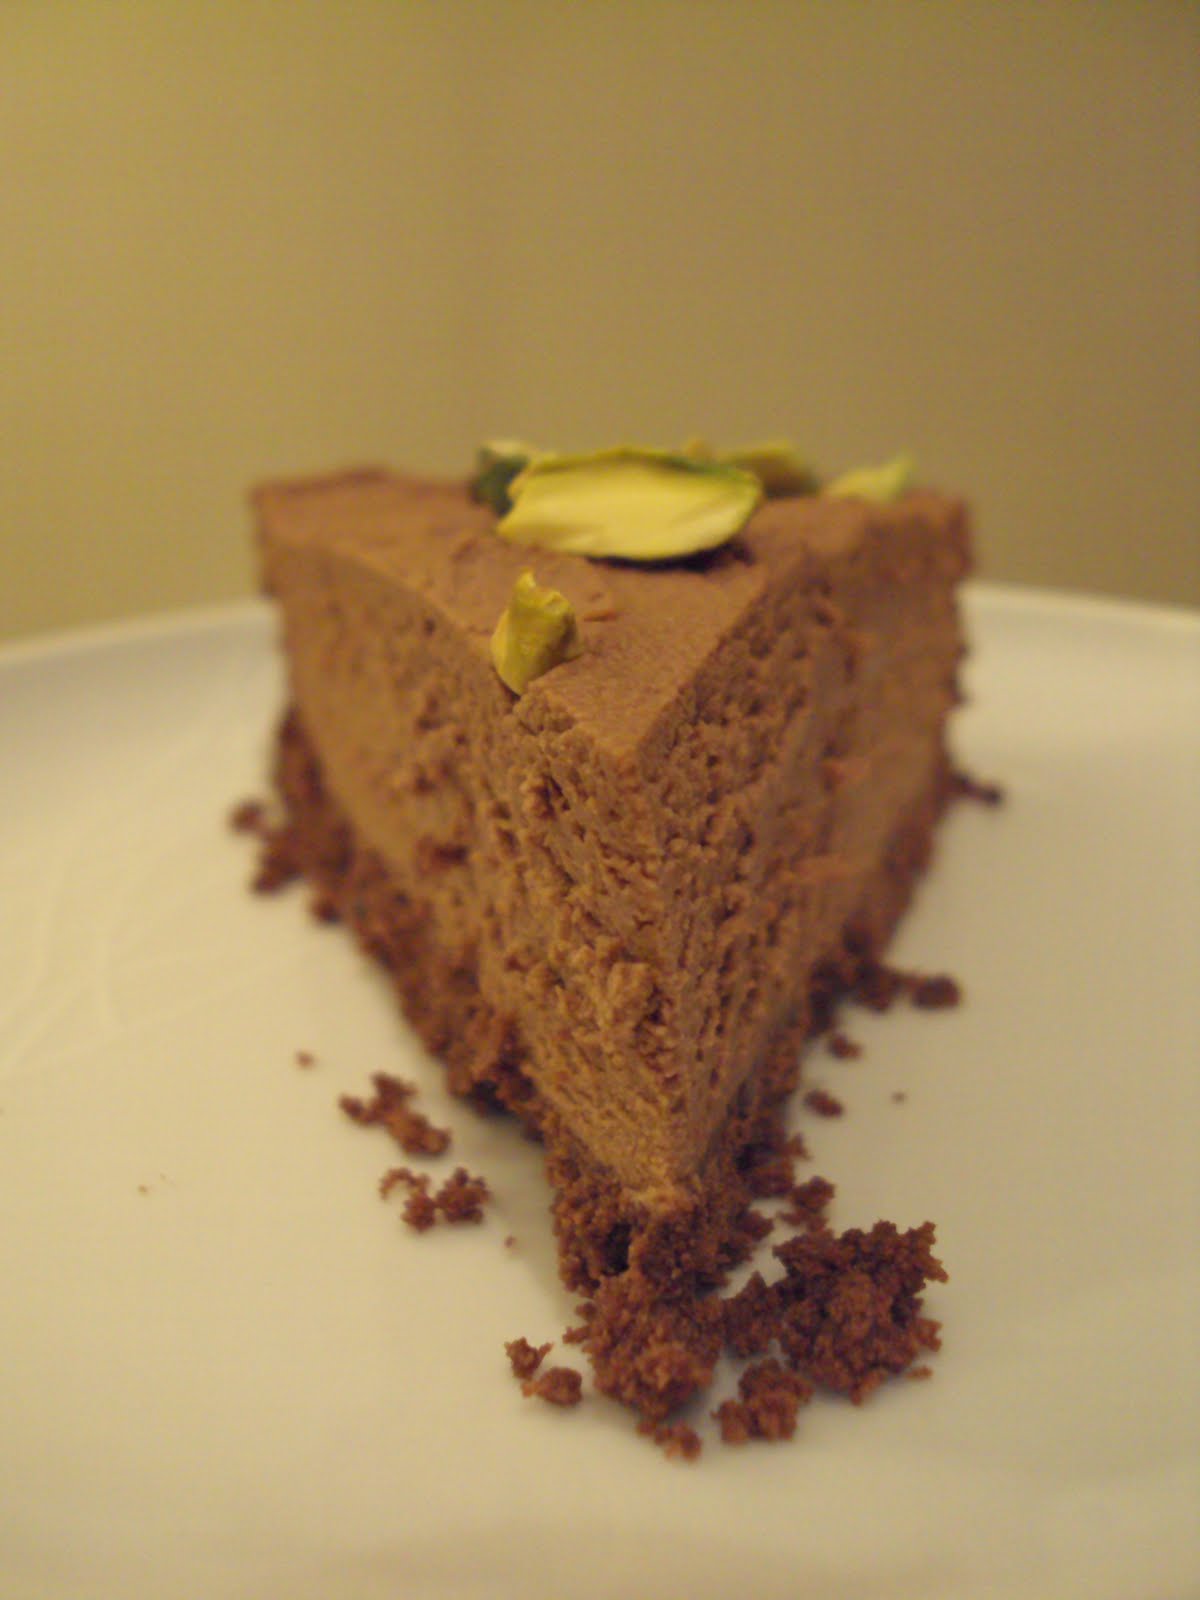


Easy Chocolate Tart with Pistachio
Serves 8 - 10

For the base
300 g bourbon biscuits
75 g unsalted butter, at room temperature
50 g good-quality dark chocolate, chopped

For the filling
250 g mascarpone cheese, at room temperature
4 tablespoons of caster sugar
100 g good-quality dark chocolate
50 g good-quality milk chocolate
300 ml double/heavy cream
Crème de cocoa blanc (white chocolate liquor), optional
Handful of pistachio nuts, coarsely chopped

1 loose bottomed 10 inch fluted tart tin, about 2 inches deep

In a food processor, process the biscuits, chopped dark chocolate and butter until they form a crumb mixture. Press into a high-sided tart tin, with your hands or the back of a spoon, making a smooth base and sides. Put into the fridge to chill and harden.

In the meantime, melt the chocolates in either a double boiler or microwave and set aside to cool a bit. In another bowl, whisk the mascarpone cheese with 2 tablespoons of the sugar. You can easily whisk by hand, but I use a hand mixer because I’ll be using it again later to whip the cream. Add the slightly cooled pool of melted chocolate to the mascarpone and mix well.

In another bowl, whip the cream with another 2 tablespoons of sugar and a good splash of crème de cocoa blanc, if using, until it starts to hold soft peaks. Fold the cream into the chocolatey mascarpone mixture to make a smooth mixture. The filling should be rather thick but still soft.

Spread the filling into the chilled base, swirling it about with palette knife or spatula to create an even surface, then put the tart back in the fridge, covered with cling to chill for at least 4 hours, but preferable overnight.
Take the tart out of the fridge for half an hour before serving and sprinkle the chopped pistachios on top of the tart.

Sunday, April 24, 2011

Springy Chocolate Birds' Nests with Willow Bird Baking

Woohoo!!! I'm in Texas! 


The move went fairly well...unless you consider the whole not being able to find the U-Haul until the last minute and finding out The Hubble's car had to go into the shop for a $400 part 2 days before we were supposed to leave "well." But hey...we all made it in one piece and nothing seems to be broken (so far). 


While I'm busy unpacking the towers of boxes surrounding us, my dearest Julie was kind enough to share one of her creative recipes with us. Julie is beyond amazing and has inspired me so much! From homemade croissants to 7 pound cheesecakes, this lady makes me strive for greatness! So after you check out this adorable cupcake topper, make sure you run over to Julie's blog and check her out (as if you don't hang on her every word already).


Thanks again Julie!!! And if you asked The Hubble, he would tell you to take a bunch of my shoes...but I'm reluctant to part with them...seeing as how they are super cute. ;-)


This is Julie from Willow Bird Baking, stepping into Maranda's glamorous shoes for a moment to bring you a guest post. And what an honor to be asked to step into these shoes! (No, seriously, they're really cute shoes. Maranda, can I have these?)

Anyway, she's just moved from the wintery middle-of-nowhere to a land of perpetual summer, so I thought I'd bring a little bit of spring to Jolts & Jollies.


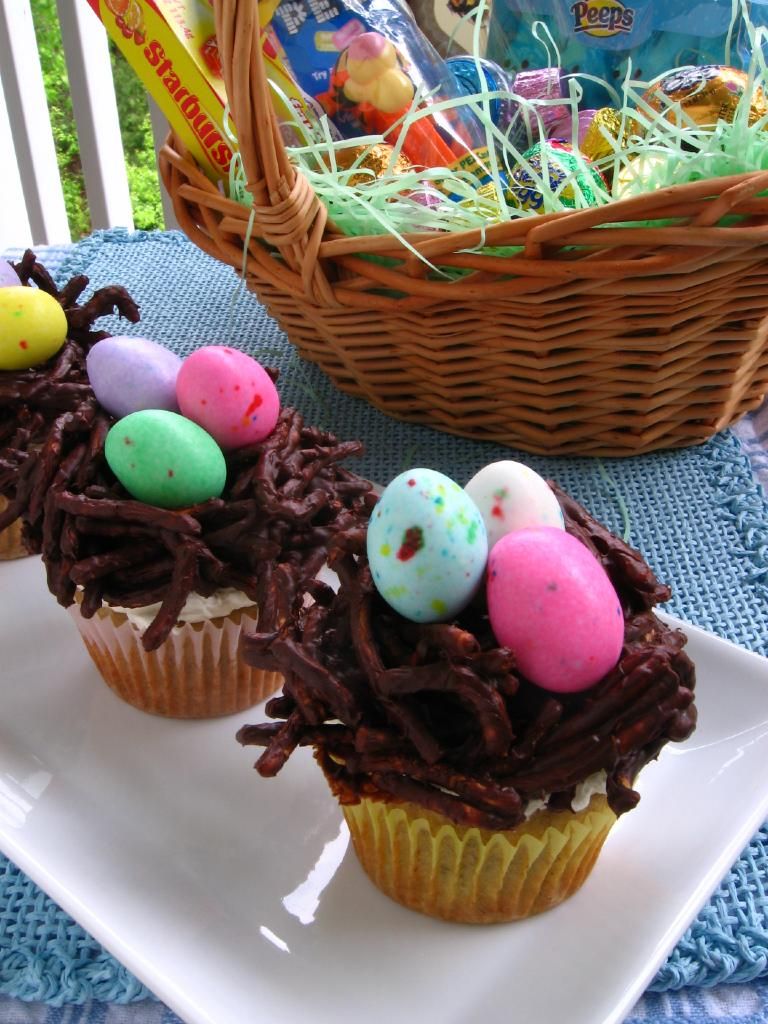
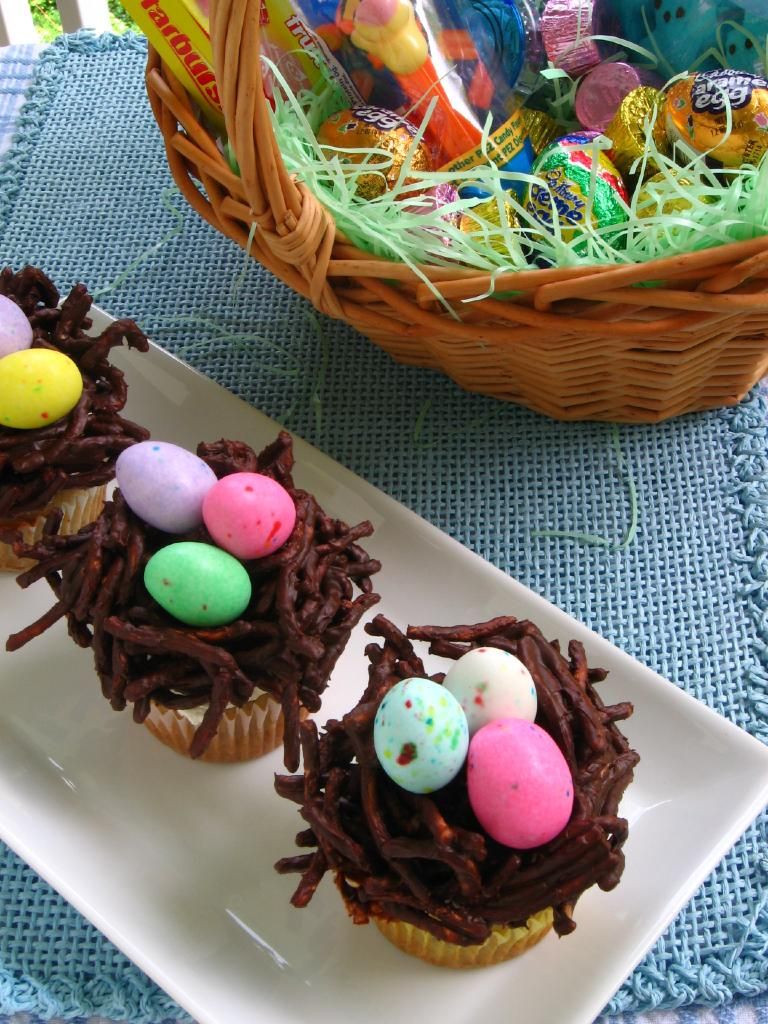
These birds' nests are a fun, sweet way to do it. They're the easiest no-bake cookies this side o' the Lone Star state (and probably on the other side, too), but are adorable when they're finished. Making birds' nests is also a great project for little hands to help with once the chocolate has cooled a bit.

You can eat these as cookies, but as you can see, I used mine as cupcake toppers for some springy cupcakes. They would also be adorable on top of a big cake.


To make about 7 of these sweet nests, you'll need:

3/4 cup chocolate chips
1 1/2 cups chow mein noodles
candy eggs (I love the malted chocolate ones!)
parchment paper or a silicone mat

Once you have your materials, melt your chocolate chips according to directions on the package, stirring as you go. Add the chow mein noodles to the chocolate and gently stir to coat. Make little 1/4 cup-ish piles of noodles on your parchment paper or silicone mat.

Let the chocolate cool for just a few minutes before molding it (while still warm and pliable) into a nest-like shape. Allow to harden fully (I stuck mine in the fridge for a few minutes) and decorate with candy eggs. Eat as cookies, or use these to top cupcakes!

Monday, April 18, 2011

Guest Post: Baking and Creating with Avril

This week we are packing up the U-Haul and heading down to Texas! I'm so excited to finally be taking the next step in our lives/The Hubble's career. That being said, I've asked a few bloggers to help me out and keep you all drooling while I'm taking these steps.

The first blogger I have to present to you all is the lovely Avril! Avril is just amazing. She always has fabulous treats on her blog. AND she had a new baby recently! So share some lovin' for Avril and don't forget to head over and check out her blog after you check out this  dessert she has for us today. 

I'm seriously going to need a pan of these as soon as I unpack my forks!


Hello!  My name is Avril and I have a blog called Baking and Creating with Avril.  I started this blog a little over a year ago when I found myself addicted to surfing all the amazing food blogs out there in blog land.  I have always had a love and passion for food - making it, creating it and serving it to those that I love and adore.  I find myself (unfortunately for my waist line) radiating towards recipes that are baked goodies. Any type of recipe that is for a cake, cookie, bar, brownie or pie makes my eyes light up with happiness.  Crazy I know!  But I am almost 100% sure that there are many of you like me in the same boat....the "Dessert Boat" of life I will call it.

I was absolutely honored that Maranda asked me to be a guest blogger for her fabulous blog.  I have met so many wonderful, wonderful fellow bloggers through my journey as a food blogger.  I consider them my friends and companions even though many (if not ALL) of the amazing people that I've met in the past year or so through my blog I have yet to actually meet in person.  My dream is that one day I will have the opportunity to meet them in person.  :-)

Today I will be sharing with you a lovely brownie recipe that I found on another food blog called, Melissa's Cuisine.  This baked treat is called Marshmallow Peanut Butter Brownies....scrumptious!


These brownies are to die for d'lish!  Very easy to put together and just perfect for this up and coming season of BBQ's as it has a fun layer of marshmallows lightly roasted ontop.  The recipe uses a box brownie mix but of course you can substitute your favorite "made from scratch" brownie recipe in place of the box mix if you so wish.

Marshmallow Peanut Butter Brownies
(recipe from Melissa's Cuisine - such a great source of yummy recipes!)
Brownie Layer Ingredients:

1 box brownie mix (9x13 size)

1/4 cup oil

1/4 water

2 eggs

Peanut Butter Layer Ingredients:

3/4 cup sugar

1/2 cup peanut butter

1/4 cup flour

2 eggs

Topping:

1 cup mini marshmallows

Directions:

1. Grease a 9x13 pan.  Preheat oven to 350 degrees F.

2. In a medium bowl combine brownie mix, oil, water and eggs. Pour batter into prepared 9x13 pan.

3. Next in a small bowl combine sugar, PB, flour and eggs.  Mix all together until fluffy...about 2 minutes.

4. Drop PB mixture onto brownie batter by the spoonfuls.  With a butter knife gently swirl PB dollops into brownie bater.  Place in oven and bake for 40 minutes, or until brownie is done.

5. Cool brownie for 10 minutes and then carefully sprinkle mini marshmallows ontop of baked brownie.  Turn broiler on and place pan of brownies under it for just about 1 minute to gently toast marshmallow layer - WATCH VERY CAREFULLY so as to make sure that marshmallows do NOT burn.

6. Cool and then cut.  A good tip that Melissa suggested for cutting the brownies is to wet the knife with water before cutting into brownies, it will keep the marshmallows from sticking to the knife.

Of course then you may have to do the same with your fork if you choose to eat the brownies with a fork......


Such a yummy treat!


Enjoy....and Happy Marshmallow Peanut Butter Brownie Baking! 


Thursday, January 13, 2011

Guest Blogger Recap

I don't know about you and your holidays...but mine were a bit crazy.

What with traveling about 6,000 miles over the course of 3 weeks, I can't say I found a ton of time for the computer.

How about you? Did you have much computer time over the last month or so?

I didn't think so. ;-p

Since I had so many amazing and talented bloggers grace the pages of my little site, I don't want them to have been missed due to the hustle and bustle of the craziest season of the year.

Therefore, it is my privilege to provide you a little recap of the scrumptious treats you may or may not have missed.

Next week, I'll be back to share some of the recipes I made before I took off...and maybe I'll even start cooking again!

So here we go with the recap:


We kicked off the season with Sarah from Life is Still Sweet. Sarah made us these ooey gooey walnut chews. Well...she actually made them for Santa...but I won't tell that she ate half the tray on her own.


Next up, we were tempted with these fluffy homemade marshmallows from Katie at gdk. Katie topped this decadent chocolate cake with her marshmallows. This technique will get anyone drooling.


I felt like the luckiest girl in the world when I was able to meet miss Monica from Lick the Bowl Good. I was over the moon when I was then able to feature her coffee chocolate chip muffins, as I'm sure you were when you saw this mouthwatering recipe!


Next, we had oreo truffle balls from Kendra at Uncork & Unwined. These bite sized balls of oreo heaven are perfect for parties...or get togethers...or dinner parties...or just because.


Then we had Jessica from The Tale of Two Kitchens with a healthy, light and luck filled black eyed pea salad. Apparently, eating black eye peas on new years day is supposed to give you luck for the rest of the year. Who knew??? This salad is full of fresh vegetables and a little heat from the jalapeno addition. I think the lucky part is being able to enjoy such a delicious, yet good for you, salad.


Switching things up a bit...we had Julie from Mommie Cooks provide us with a recipe for hot buttered rum. Please SOMEONE tell me I'm not the only one who thinks of Harry Potter whenever I see this recipe?? The amazing thing about Julie is that she loves to give kid friendly options to "adult" recipes. Whip up this hot drink in place of hot chocolate on a cold, snowy day...then add the rum for your "nerves." ;-)


And finally, there was Ingrid from 3 B's...baseball, baking and books with this cinnamon roll cake. I have already had a couple friends make this cake since Ingrid shared it with us on Monday and it has been met with rave reviews. Even if you don't eat this cake, just make it...it makes your house smell delicious!

Thanks so much to all of you guest bloggers for sharing your recipes and hearts with us.

And thank you, dear reader, for taking the time to visit my little site and give so much love to me and all these amazingly talented women.

Monday, January 10, 2011

Guest Post: 3 B's...Baseball, Baking & Books

Well...my vacation is over.


We arrived home last night and are trying to get settled back into the daily grind.


The Hubble is back and work and Little Butt are still trying to figure out what we are supposed to do every day.


I am not quite ready to jump back in here at Jolts & Jollies so I have one last guest blogger for you!


Today I am introducing you to Ingrid! Unless you already know her of course.


Ingrid is my last (but absolutely not my least) guest blogger.


Ingrid is my sister in procrastination to be sure.


In fact, I had almost written her off as a lost cause...but she was able to take time out of her insanely busy schedule to share a recipe with us. And boy am I glad she found the time! Today's recipe looks amazing!


Even though I think she was trying to get back at me for taking a month to send her some apple butter, I still love the lady and you will too once you check out her blog and get to know her.


Thanks for sharing this recipe with us Ingrid! I know your schedule the last couple months has been crazy and you haven't had time to blog on your own blog. You are an amazing person and friend.


So. Without further ado. Heeeeeeere's Ingrid!


Hi!  I’m Ingrid from 3B’s….Baseball, Baking, & Books!  Before I share my recipe with you I’d like to thank Maranda for having me here on Jolts & Jollies!  I’d like also like to thank her for her patience with me.  :)  Thanks, Manna!


I had a really difficult time choosing what to make and blog about for Maranda.  During the craziness that was my December I worked on a few posts but none seemed right.  It wasn’t until my boys started bugging me about making them a cinnamon roll cake that it dawned on me.  I need to share my love of  easy, family friendly desserts with you and what better one than this cinnamon roll cake. This recipe gets top marks for quick and easy from me and the cinnamony sugary “filling” gets two thumbs up from my family and friends!


Cinnamon Roll Cake
By 3B’s….Baseball, Baking, & Books


Cake Ingredients:

  • 1 Yellow Cake Mix 
  • 4 eggs, room temperature
  • 3/4 cup oil 
  • 1 cup sour cream, room temperature

“Filling” Ingredients:

  • 1 cup brown sugar 
  • 1 Tbsp cinnamon 

Directions:

  1. Preheat oven to 325 degrees. Grease a 9x13 pan. 
  2. Mix cake ingredients by hand and pour in greased baking pan. 
  3. Mix the filling ingredients and sprinkle over cake batter. (It should cover the top of the batter.) 
  4. Swirl the “filling” into batter with knife. (The batter is thick & you’ll need to use a little elbow grease.) 
  5. Bake for 40 minutes. (Mine was done in 30 minutes.)  
  6. Let cake cool 10 – 15 minutes before icing.

Icing:

  • 2 cups powdered sugar 
  • 4 Tbsp milk (I used heavy cream and had to add more to get the consistency I needed.)
Mix & pour over warm cake.


Friday, January 7, 2011

Guest Post: Mommie Cooks

I am sad to say that my vacation, and my guest bloggers, are soon coming to an end.

We leave El Paso tomorrow morning to make the 2 day drive back home.

Luckily, I have absolutely fabulous friends who have been kind enough to help me out through this time.

Julie is my next to last guest blogger. Sad!

I found Julie from Mommie Cooks when I joined the Daring Bakers. Not only did I see her there, I also was directed to her blog when another blogger was guest posting for her.

I think it's kind of funny that I 'met' Julie when she was on vacation. She had a bunch of bloggers guest posting for her during her time away.

I am slightly shamed to say that I started commenting on her blog because she was having a contest through the comments left during her vacation.

However, I became so enamored with her vacation stories and her writing style that I soon forgot she was even having a contest. I was just commenting and anxiously awaiting her return to her blog.

Julie and I have been conversing through our blogs, emails and twitter ever since and I have never looked back.

This lady is extremely high on my list of people I would love to meet one day. She is genuine, caring, sweet and full of creative recipes (several of which I've made and they have all been awesome!).

If you don't know Julie yet, I INSIST that you head over to her blog to see what her and her boys are cooking up now. But check out this post first because I am SUPER excited about the recipe she's sharing with us today. This one makes me think of Harry Potter above anything else.

Thanks for helping out Julie!


Maranda is one of those rare people that, when you meet her, you know you’ve found someone special.   She and I stumbled across one another’s blogs a few months back.  Aside from the fact that each recipe she posts is more mouthwatering than the next (I’m still drooling over that King Ranch Chicken “esque” recipe she posted a month or so back), her writing brings across a kindness that welcomes you in and makes you want to get to know her better.   And once you do, you instantly know you’ve found a friend for life.

That’s why when she asked me to guest post over at her place for the day; I quickly jumped at the chance.  So here goes nothing.  Let me present Hot Buttered Rum.  This stuff is good.  Real good.  And the best part about it is that the batter is non-alcoholic.  You add rum after the fact, so kiddos can have a virgin version and participate in festivities right along with the adults.

To whip up a cup of this tasty hot drink, you’ll need to head over to your fridge/freezer and scrounge up the following cast of characters:


2 Sticks of Butter
(yea, not sure where they went but you’ll need them.  Trust me on this one.)
1 Cup of Confectioners Sugar
½ Cup of Brown Sugar
½ Cup of White Sugar
1 tsp of Vanilla
½ tsp of Nutmeg
2 Cups of Ice Cream, Softened

First up, you’ll cream together the butter and your three sugars.


When it’s good and mixed together, add in the vanilla and nutmeg.   Last but not least, add in your softened ice cream and stir it to combine.


Mmmm.  Now doesn’t that look good? 


Your batter can be stored in the freezer.  When you’re ready to serve up a mug of yumminess, you’ll simply place a heaping tablespoon or two of the mixture in a mug, fill it with hot water and a jigger of rum (you’ll leave the rum out for virgin), stir well, sprinkle a little nutmeg on top and prepare to be warmed from the inside out.  Look out hot coca, you’ve got competition.


Thanks again Maranda for allowing me to spend a day over at your blog!

Wednesday, January 5, 2011

Guest Post: The Tale of Two Kitchens

One of the things I love most about the blogosphere is the connections I have made with people I would have never known otherwise.

My favorite part of the military spouse blog community is the fact that spouses of different military branches can come together and share our histories and stories with no animosity.

So far I have had guest posts from a Marine wife, an Army wife and today I am introducing you to Jessica, and Air Force wife.

I 'met' Jessica through her blog Jesstagirl and Her Officer.

I was more than thrilled when I found out Jessica was creating a food blog with her sister in law.

Jessica and her sister in law are new to the food blogging world but I think they are fabulous and I think you will too. You should definitely jump over there and check them out...after you read her guest post.

It's all yours Jessica!


I am so excited and honored to be guest posting for Maranda on Jolts and Jollies. I'm always so excited whenever she posts a new recipe, because I know her recipes are easy to make and delicious. My sister-in-law and I recently started a cooking blog called The Tale of Two Kitchens, and I'd love for you to check it out—after this recipe, of course! 

This recipe has been in my family for years—I can't remember a New Years where my mom didn't make this black-eyed pea salad. Black-eyed peas are supposed to be eaten on new year's day for good luck in the coming year. But truth be told, I typically eat this several days after January 1st, because I'm usually too busy and always forget about it on New Year's Day. I like to think the black-eyed peas will bring good luck whenever I eat them.

This salad is full of fiber, flavorful, and is perfect to keep in the fridge for a quick, filling snack. The flavor of the salad gets better with time, so don't be surprised if you find yourself eating a huge bowl days after you make it.


In a medium pot, combine frozen black-eyed peas, salt, vegetable broth, water, sugar, jalapeno pepper, and bay leaf. Bring to a boil. Reduce heat, cover, and simmer for 20 minutes.


Turn off heat and allow peas to cool in the cooking broth for two hours or overnight before finishing salad.


There should be about ¼ cup of cooking liquid left in the kettle. Discard the bay leaf and dice jalapeno (optional).


Stir tin cider vinegar and olive oil into the cooking liquid. Add green pepper...


Tomato...


Green onion and jalapeno (optional).


Toss to mix; serve chilled or at room temperature.


Black-Eyed Pea Salad
by Jessica Lynn from The Tale of Two Kitchens


Ingredients:
  • 1 (16-ounce) bag frozen black-eyed peas
  • 1/4  teaspoon salt
  • 1 (14.5-ounce) can vegetable broth
  • 1 cup water
  • 1 teaspoon sugar
  • 1 jalapeno, rinsed but left whole
  • 1 bay leaf
  • 4 tablespoons cider vinegar
  • 1 tablespoon extra virgin olive oil
  • 1 green pepper, seeded and chopped (about 1 cup)
  • 2 medium ripe tomatoes, diced
  • 2 green onions
Directions:

  1. In a medium pot, combine frozen black-eyed peas, salt, vegetable broth, water, sugar, jalapeno pepper, and bay leaf. Bring to a boil. Reduce heat, cover, and simmer for 20 minutes.
  2. Turn off heat and allow peas to cool in the cooking broth for two hours or overnight before finishing salad.
  3. There should be about ¼ cup of cooking liquid left in the kettle. Discard the bay leaf and dice jalapeno (optional). Stir tin cider vinegar and olive oil into the cooking liquid. Add green pepper, tomato, green onion, and jalapeno (optional). 
  4. Toss to mix; serve chilled or at room temperature. 

Monday, January 3, 2011

Guest Post: Uncork & Unwined

This is my first post for 2011!!!

Seriously. Where did 2010 go??

I know I've asked that before, but it seems no one can answer my question.

I am currently sitting in El Paso, TX at my in-laws house.

When we came into town it was snowing like crazy! Who knew they got snow in El Paso!!!

So while I'm continuing to be a complete internet and computer slacker, I am making other people do the work for me and keep my poor little blog company. LOL!

Today I present to you Kendra from Uncork & Unwined.

Kendra is another military spouse that I found through the blogosphere.

But let me tell you, her blog is one of the most awesome that I found in 2010.

Not only does Kendra live in Germany (picture chronicling her many travels through Europe) but she also talks about wine, coffee and shares recipes with her readers. I mean, come on...she won me over with the wine and coffee. The recipes are an added bonus. But I will admit I get incredibly slightly jealous when I see the pictures of the gorgeous European sites she visits.

To top off all those amazing qualities in Kendra's blog, she is also super sweet. Pretty much as sweet (if not sweeter) as these little balls of oreo heaven she has to share with us today!

Thanks for the recipe Kendra! Take it away!


Hi!
This is my first time guest blogging for the fabulous Maranda. I am a huge fan of her and her blogs. When she asked me to guest post for her I was so flattered. I love to cook and bake, though I mostly post dessert recipes on my own blog. This recipe is no exception. It has been a huge hit every time I've made it. It is super easy to make and so delicious. It also makes a ton so you can share (or not!).

Oreo Truffles
Courtesy of: Kraft

Ingredients:
1 pkg. of Oreos
1 pkg. of Baker's white chocolate baking squares
8 oz. cream cheese, softened

So, before I get started let me tell you that as with most good stories in my life, there is a back story here. The day before J's birthday party I spent the entire day baking. I had several treats to make that day and most required the use of a microwave. Our microwave was a loaner from the base, huge, loud, inefficient and without a precise timing function. In short, I wasnt a fan of it. It worked well enough until the day I really needed it to work. As I was in the middle of melting chocolates for this dessert the microwave stopped working. Completely. stopped. working. So I turned to my stovetop and attempted to melt the chocolate that way. Our stove heats quickly and gets extremely hot. So of course I burned the chocolate. Thankfully, I had a box of white chocolates in reserve and used those instead. I borrowed my neighbors microwave and was able to finish my treats. Ive made these truffles with semi-sweet chocolate and white chocolate and while they are good with both, I actually like them with white chocolate better. I might not have discovered that if my microwave hadnt broken, so I guess it was a blessing in disguise. (And we received a MUCH better microwave when I took the broken one back!)

Three simple ingredients

I took this picture prior to burning the semi-sweet chocolate. Ha!

1. Crush the Oreos in a medium bowl. I used a food processor, but you can use a freezer bag and a can of soup. 


2. Mix 3 cups of Oreos with the cream cheese. Reserve the rest of the crumbs for later.


3. Roll into 1 inch balls and place on wax paper lined cookie sheets.


4. Dip each truffle in white chocolate and place back on wax-paper lined cookie sheet. I used a fork to dip them into the chocolate.  


5. Sprinkle each truffle with remaining Oreo crumbs. 


6. Enjoy! 


Wednesday, December 29, 2010

Guest Post: Lick the Bowl Good

Today I have a really special treat for you! It's Monica from Lick the Bowl Good!

Monica is always baking or cooking up something that is absolutely mouthwatering.

I am one lucky girl at this point. Last week, I had the pleasure of getting to meet Monica!


Monica helped me realize that I have no pictures of myself on my blog...so there ya go!

This lady is so sweet. And a ton of fun.

I found myself wanting to hang out with her every day until we left Austin.

Alas, I had family and other friends to visit while we were in town so we only got to hang out for one afternoon.

But I'm more than happy to have had even that small amount of time with her.

Luckily, I still have her blog to visit. And so do you!

Monica is sharing an incredible recipe with us today. After you read this post you should head over to Monica's blog and show her as much love as she puts into her recipes and posts.

Thanks again Monica, not only for this wonderful guest post but also for a great afternoon. I hope we have many more to come!


Hello Jolts and Jollies fans! I am Monica from Lick The Bowl Good and I am happy to be here guest posting on Maranda's blog. I "met" Maranda several months back- she was a loyal reader of my blogs and commented occasionally, but I didn't really know who she was. Then one day, she emailed me and introduced herself to me. She was so genuine and nice and we became instant blog buddies. We emailed back and forth and found out that she's from Texas and her family and I lived in the same town! How crazy is that?


Over the past few months, I've gotten to know Maranda better and I realize she likes her coffee just as much as I do. I've shared this recipe on my blog before, but I know she'd love them, so here they are again! They're loaded with butter and instant coffee/espresso, but they're light and tender and they melt in your mouth. It doesn't seem possible, but it's true. These muffins are studded with chocolate chips which adds a bit of sweetness and compliments the coffee flavor very nicely.


This recipe makes quite a bit of muffins, but it can easily be halved. Or make the full batch and freeze them in Ziploc bags, like I did. Take one or two out, thaw or nuke 'em for about 20 seconds to bring them to room temperature. They're perfect every time.

Thank you Maranda for asking me to be a guest blogger on Jolts & Jollies. I hope you and your readers will enjoy these caffeinated beauties. They're sure to put a "jolt" in your step :-)


Coffee Chocolate Chip Muffins from LTBG
Printer Friendly Version
Beat at high speed in a large bowl until fluffy:

  • 3 sticks (1 1/2 cups) butter
  • 1 cup sugar
  • 1/2 brown sugar, packed
  • 2 large eggs
  • 5 tbsp instant espresso powder*
Sift in:

  • 4 cups all purpose flour
  • 2 tbsp baking powder
  • 1/4 tsp salt
At low speed add until just combined:
  • 1 cup milk
  • 1 cup chocolate chips
Scoop the batter into prepared muffin tins.
Bake at 350F for 20 - 25 minutes or until tester inserted in center comes out clean.

Makes 24-28 muffins.


Related Posts with Thumbnails