


Once upon I used to sit for hours and hours in my grandmother's kitchen watching her cook.
Somewhere along the way from childhood to adulthood, I lost her love for the kitchen. Until December 2009 that is.
In December 2009 I took my very first cake decorating class. After that first class I started searching for other cake decorator's, like myself. I joined a couple communities on LiveJournal. One of these communities was called bakebakebake.
One day, when perusing that baking community I saw the most amazing pictures of baked goods. These pictures were of a Daring Bakers challenge. I clicked on the link and was transported to a type of site I had never known existed!
It was a food blog called Willow Bird Baking. This food blog was beautiful, detailed and well written by the author. I was immediately inspired.
I'm not sure Julie over at Willow Bird Baking understands the impact she has made on my life through her baking. I'm even thinking that if I ever get to meet her I might need to order an apron that says "Jolts & Jollies loves Willow Bird Baking." So naturally, when she threw the gauntlet and challenged other bakers to commit to croissant, I was literally first in line.
Because of Julie I am now a Daring Baker myself. I have shared some of those challenges with you so far, remember the pavlova and the swiss swirl ice cream cake? Now I would like to share the croissant challenge as well. If you are feeling inspired Julie and I are challenging you to head over to her post and commit to croissant as well.
Here we go:

Grab your ingredients: unbleached all purpose flour, kosher salt, whole milk, butter, yeast, brown sugar, chocolate and an egg.

Toss the yeast in a mixing bowl.

Add in the brown sugar.

And whisk them together until combined.

In a small saucepan, heat your milk until it's between 105 degrees F to 110 degrees F.

Pour the warm milk into the bowl with the yeast and brown sugar.

Whisk it all together until the yeast dissolves.

Let it sit without messing with it for about 5 minutes. It should foam up nicely. If it doesn't, toss and start again. Actually, this is my take 2. The first time didn't foam. But I found success by doing things in this order.

Once you are all foamy, dump in the flour...

And the salt...

Then mix with a dough hook on low...

Until the dough is smooth and soft. This will take about 7 minutes.

Dump the dough onto a well floured work surface and knead by hand about 2 minutes (adding flour a bit at a time as needed) until the dough is soft and pliable. Work the dough into about a 1 1/2 inch thick rectangle.

Wrap the dough in plastic wrap and place in the fridge to chill for about an hour.

Once the hour is up, grab your chilled butter and arrange with the sides touching one another...

And start pounding it with a rolling pin to make it soft, yet still cold.

And it's pretty much a bad idea to put it on a paper towel.

I moved it to a towel but it would really be best to pound it on the work surface. You can use a bit of flour if it starts sticking to the work surface and or rolling pin.

You want to pound it out until it is about 8 inches by 5 inches.

Wrap the butter in a towel and place in the fridge.

Now grab your dough and unwrap it.

You want to roll it out to a 16 inch by 10 inch rectangle and arrange with the short side nearest you.

Place the butter horizontally in the center of the rectangle of dough.

Fold the bottom third over the butter...

Then fold over the top third.

Carefully arrange it so the short side is nearest you.

This is when we start our first fold. Lightly pound out the dough with the rolling pin...

So it flattens and stretches a bit...

Then roll it out to a 15 inch by 10 inch rectangle.

Fold up the bottom third of the dough...

Then the top third. Make sure to stretch out the corners a bit to shape it.

Use your finger (or knuckle) to make an indention in the dough to mark which fold you are on.

Wrap the dough in plastic and place in the fridge for 1 hour. That's the end of the first fold. We need to do that process again...

So we have fold number 2...

Fold number 3...

And finally, fold number 4. At this point, after we've folded the dough 4 times, we place in the fridge for 8 hours or so. Be sure not to leave it in the fridge for more than 18 hours because things start to break and the yeast won't work.

At this point, it's probably the next morning and we've rested. Take the dough out of the fridge (it should be nice and fat now) and cut it in half.

Place one half back in the fridge and look at the beautiful layers in the half you are going to work with.

It's time to roll the dough out into a 16 inch by 12 inch rectangle. Pull and stretch the corners to help shape it.

Use a pizza cutter to trim the edges and make it pretty.
At this point I decided to be a nerd and not take pictures of the cutting process. Julie has a great diagram HERE. Basically, you want to cut the dough in half horizontally. Then cut it in thirds vertically. You should have 6 tall rectangles. Cut each of those once diagonally to create 12 triangles. (Check out the diagram to see how to cut the pain au chocolate).
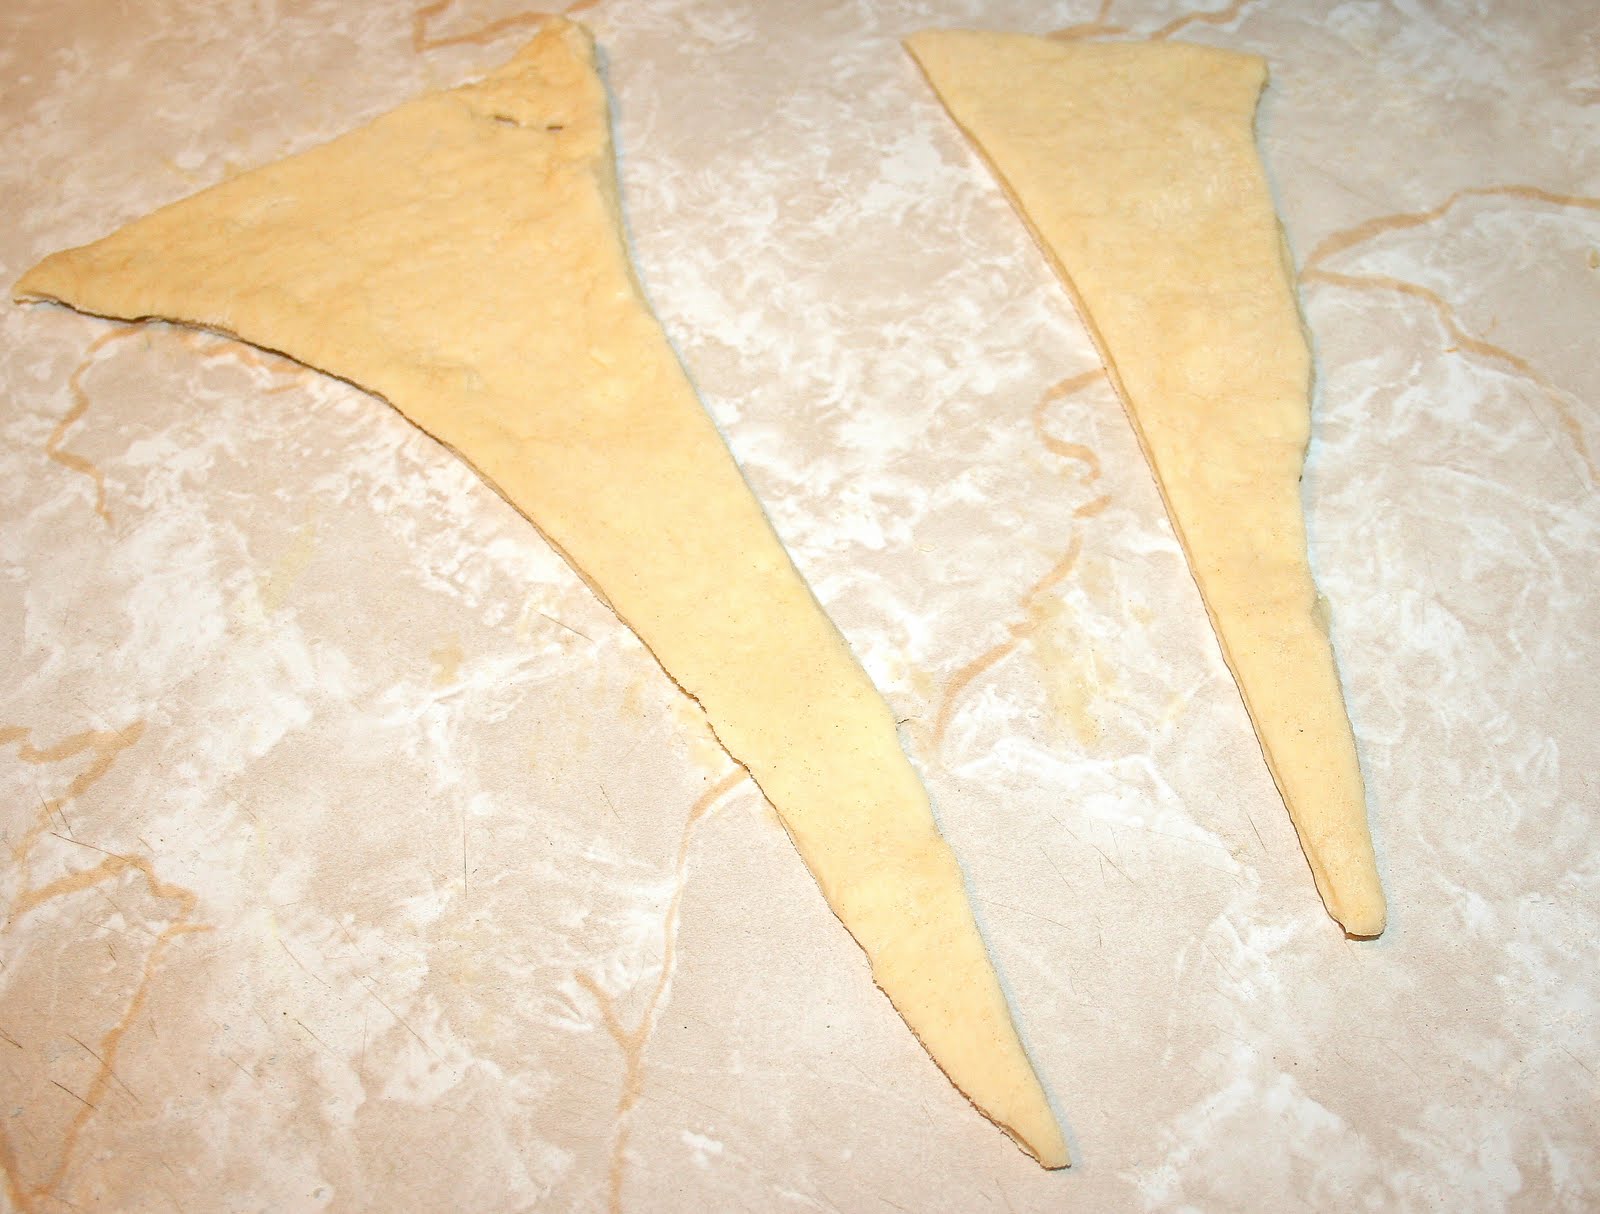
Take your triangles and shape and stretch them to about 50% bigger than they started.

As you pull the "tail" taut roll up the top portion to create the croissant shape. Connect the little arms. (For an instructional video of this click HERE).

You can also place your chocolate in your dough rectangles for the pain au chocolat at this point.

Then roll them up, seal the edges and press them a bit flat.

Once your little croissants are lined up and ready to be proofed...

You want to brush them with your egg wash.

Turn on the oven to 100 degrees for a few minutes. Then turn it off until it is just barely warm. Then place them in the oven for about 2 1/2 hours until they are 1 1/2 times bigger than before.
At this point you want to take them out of the oven to preheat. Place an oven safe dish of water under the cooking rack and spritz of 'finger splash" some water all around inside the oven. Place the uncooked croissants in the oven and spritz or splash water in again. Shut the door.

Cook the croissants for 8 minutes without opening the door. After the 8 minutes, rotate the baking sheet 180 degrees (if more than one baking sheet on the rack, switch their positions as well). Then bake another 8 to 10 minutes until very golden brown.

Then serve...

And enjoy!
Homemade Butter Croissants and Pain au Chocolat
Retrieved from Willow Bird Baking
Ingredients:
- 1 1/2 cups whole milk, heated to warm (105°F–110°F) (use a candy thermometer to determine)
- 1/4 cup packed light brown sugar
- 1 tablespoon plus 1/4 teaspoon active dry yeast (from two 1/4-oz packages)
- 3 3/4 to 4 1/2 cups unbleached all-purpose flour
- 1 tablespoon kosher salt
- 3 sticks (1 1/2 cups) cold unsalted butter
- 1 egg, lightly beaten, for egg wash
- 1 teaspoon cream or milk for egg wash
- chocolate batons or bittersweet chips for pain au chocolat, if desired
Make dough:
Stir together warm milk, brown sugar, and yeast in bowl of standing mixer and let stand until foamy, about 5 minutes. (If it doesn’t foam, discard and start over.) Add 3 3/4 cups flour and salt and mix with dough hook at low speed until dough is smooth and very soft, about 7 minutes.
Transfer dough to a work surface and knead by hand 2 minutes, adding more flour as necessary, a little at a time, to make a soft, slightly sticky dough. Form dough into a roughly 1 1/2-inch-thick rectangle and chill, wrapped in plastic wrap, until cold, about 1 hour.
Prepare and shape butter:
After dough has chilled, arrange sticks of butter horizontally, their sides touching, on a work surface. Pound butter with a rolling pin to soften slightly (butter should be malleable but still cold). Scrape butter into a block and put on a kitchen towel, then cover with other towel. Pound and roll out on both sides until butter forms a uniform 8- by 5-inch rectangle. Chill, wrapped in towels, while rolling out dough.
Roll out dough:
Unwrap dough and roll out on a lightly floured surface, dusting with flour as necessary and lifting and stretching dough (especially in corners), into a 16- by 10-inch rectangle. Arrange dough with a short side nearest you. Put butter in center of dough so that long sides of butter are parallel to short sides of dough. Fold as you would a letter: bottom third of dough over butter, then top third down over dough. Brush off excess flour with pastry brush.
Roll out dough:
Turn dough so a short side is nearest you, then flatten dough slightly by pressing down horizontally with rolling pin across dough at regular intervals, making uniform impressions. Roll out dough into a 15- by 10-inch rectangle, rolling just to but not over ends.
Brush off any excess flour. Fold in thirds like a letter, as above, stretching corners to square off dough, forming a 10- by 5-inch rectangle. (You have completed the first “fold.” Make one impression in the dough with a finger to remind yourself that one fold is finished.) Chill, wrapped in plastic wrap, 1 hour.
Make remaining “folds”:
Make 3 more folds in same manner, chilling dough 1 hour after each fold, for a total of 4 folds. (If any butter oozes out while rolling, sprinkle with flour to prevent sticking.) Wrap dough tightly in plastic wrap and chill at least 8 hours but no more than 18 (after 18 hours, dough may not rise sufficiently when baked).
Roll out and cut dough:
Cut dough in half and chill 1 half, wrapped in plastic wrap. Roll out other half on a lightly floured surface, dusting with flour as necessary and stretching corners to maintain shape, into a 16- by 12-inch rectangle. Brush off excess flour with pastry brush and trim edges with a pizza wheel or sharp knife.
Arrange dough with a short side nearest you. Cut in half horizontally and chill 1 half. Cut remaining half vertically into thirds, forming 3 rectangles. Cut each rectangle diagonally in half to make 2 triangles, for a total of 6 triangles. If you’re making pain au chocolat as well, cut some of the dough into smaller rectangles (see diagram HERE.)
Shape croissants:
Holding short side (side opposite tip) of 1 triangle in one hand, stretch dough, tugging and sliding with other hand toward tip to elongate by about 50 percent.
Return to work surface with short side of triangle nearest you. Beginning with short side, roll up triangle toward tip. Croissant should overlap 3 times, with tip sticking out from underneath; you may need to stretch dough while rolling.)
Put croissant, tip side down, on a parchment-lined large baking sheet. (Curve ends inward to make a crescent shape if desired, joining their cute little arms. They won’t stay joined during proofing, but this will help ensure that they do maintain their shape. You can use a minute drop of water to seal their arms closed if the dough seems dry.)
Make more croissants with remaining 5 triangles, then with remaining rolled-out dough, arranging them 2 inches apart on baking sheet. Repeat rolling, cutting, and shaping procedures with chilled piece of dough. Note: To make pain au chocolat, simply place a chocolate baton or bittersweet chips on one side of the rectangle (about 1/4-inch from the edge) and roll it up — very simple!)
Freeze croissants, if desired:
This is the point at which you may place shaped, unproofed croissants on a baking sheet lined with wax paper in the freezer for an hour or two, until frozen. Then place them in a ziplock bag and freeze. They’re absolutely best when baked within a week. When ready to bake (from frozen), thaw overnight in the refrigerator and proceed to the proofing step as normal. If not freezing, skip this step entirely and proceed to proofing.
Proof your croissants:
First, brush croissants with a lightly beaten egg mixed with a teaspoon of milk or cream. Then proof. Julie uses the Pastries from La Brea Bakery method here. Turn the oven on to 100 degrees. After a few minutes, turn the oven off and open the door. When the temperature drops to just slightly warm, place the croissants in the oven and close the door. Let the croissants rise for 2 to 2 1/2 hours or until they are about 1 1/2 times their size, feel marshmallow-y, and leave a slight indent when touched. Make sure to remove the croissants before heating the oven for baking.
Bake croissants:
For best results, bake one pan of croissants at a time (or two pans on the same rack, if they’ll fit). Preheat to 425°F. Place an oven-safe dish full of water on the rack below where the croissants will be baking to produce steam.
Spritz inside oven generously with spray bottle and close door (I used my hands for this — just sprinkled water around). Put croissants in oven, then spritz again before closing door. Reduce temperature to 400°F and bake 8 minutes without opening door.
Switch position of sheets in oven and rotate sheets 180°, then reduce temperature to 375°F and bake until croissants are deep golden, about 8-10 minutes more. Do not take them out at light golden brown, or they’ll be doughy in the middle. They need to get good and golden on the outside.
Serve and enjoy!