Showing posts with label icing. Show all posts

Tuesday, June 26, 2012

Pokemon Birthday Cake


For my family, I am the resident birthday cake maker.

It wasn't always this way. I only started baking and decorating cakes within the last couple of years, and I don't decorate cakes as often as I would like. But that's neither here nor there.

My Older Sister has 3 kids. One girl, 2 boys. Both of her boys have birthdays in June. We celebrated her older boy's birthday last weekend and her younger boy's birthday this past weekend.

The ages between her 2 youngest children are kind of funny. Her older son just turned 17 and her younger son just turned 5!

As you can imagine, the birthday cakes were decidedly different.
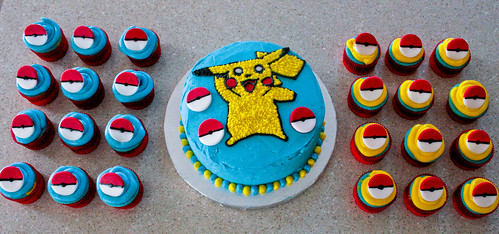

My little nephew decided he wanted Pokemon for his birthday. And since I'm the resident cake maker, it was up to me to figure out what to do. My sister gives me full creative license. LOL!

Luckily, her oldest (my niece) is a lot like me so we brainstormed together. This is what we came up with. A Pikachu cake with Poke-ball cupcakes.
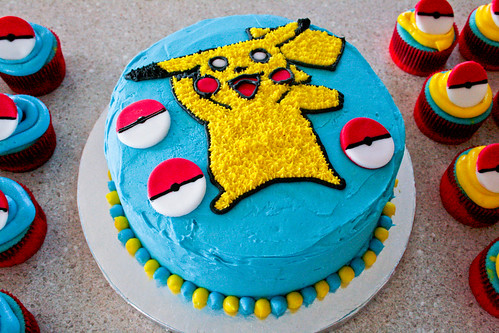

The cake was a two layer chocolate cake with buttercream icing rippled through the center and enveloping the cake layers. I printed a picture of Pikachu off the internet and used that to make the outline.
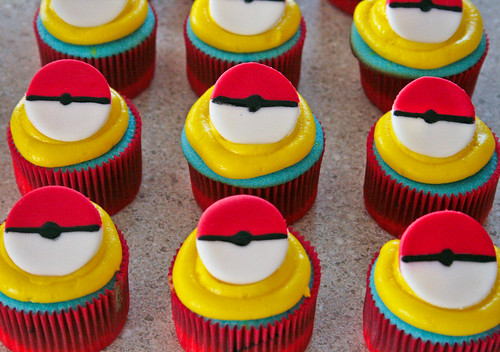

For the cupcakes, I found a white cake recipe to try. I colored half of the batter yellow and the other half blue. I layered the batter in the red cupcake liners and baked them up. Each cupcake was yellow and blue inside and topped with the same buttercream icing I used for the cake.


The Poke-balls were made from red and white fondant. My niece made the Poke-balls and I think she did an amazing job! She took equal amounts of red and white fondant, matched up the edges, and evenly rolled it out. She then took a small cookie cutter and made the rounds. I bought some black edible ink for the "seam." It was pretty runny and some of the seams melted in the 100 degree F Texas heat on the way to the party place. Oops. Oh well.


My little nephew seemed pretty pleased with the cake. He said it was "awesome!"

The chocolate cake is my go-to chocolate cake so it was, of course, delicious.

My niece and I were unhappy with the white cake. It tasted too eggy to me. But everyone else said they were great. Of course, this could be because I messed up when making the batter. AND the batter ended up getting over mixed due to having to color it. It was most likely my fault that I didn't like the taste.

This was my first time using this buttercream recipe as well and I must say, I have found a winner. It was easy to work with and held its shape quite well...even in my hot house and the Texas heat!
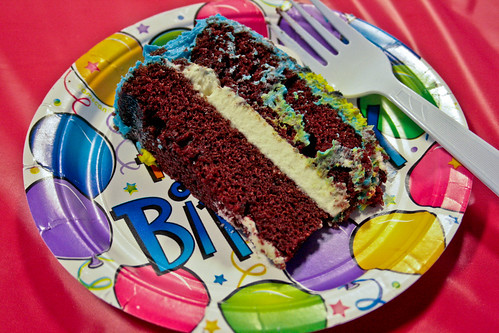

I was able to snap a quick picture of the inside of the cake. Sadly, I didn't cut it so it was pretty messy. But whatever, it's birthday cake. This was my piece. After I took this picture, I was standing next to a table enjoying my first two bites and my Baby Sister walked by and accidentally hit my plate with her arm. Everything went in slow motion as my plate leaped from my hands and landed face down on the floor as I tried to catch it. She quickly turned and realized what happened. She started apologizing and all I could do was laugh my head off! What can you do??

I didn't get a picture of the inside of the cupcakes. But they were pretty fun.


All in all, everyone seemed happy with the cake and cupcakes. I was pleased with how they turned out. And the birthday boy was happy so that's all that matters.

One Bowl Chocolate Cake
Adapted from Sky High via Lick the Bowl Good

Printer Friendly Version

Ingredients:

  • 1 1/2 cups unbleached all purpose flour
  • 1 1/4 cups sugar
  • 1/4 cup natural unsweetened cocoa powder
  • 1 teaspoon baking soda
  • 1/2 teaspoon baking powder
  • 1/2 teaspoon salt
  • 1/3 cup vegetable or canola oil
  • 1 cup water
  • 1 teaspoon pure vanilla extract
  • 2 eggs, lightly beaten
Directions:
  1. Preheat oven to 350 degrees F. Spray two 8-inch or 9-inch cake pans with baking spray.
  2. In a large mixing bowl, whisk together the flour, sugar, cocoa powder, baking soda, baking powder, and salt until well combined.
  3. Add the oil and 1/2 cup of the water to the dry ingredients and whisk until just combined.
  4. Add the remaining 1/2 cup water, eggs, and vanilla. Whisk until smooth.
  5. Evenly divide the batter between the prepared pans.
  6. Bake for 18 to 20 minutes or until a tester inserted into the center of the cakes comes out clean.
  7. Allow to cool in the pan for 10 minutes then invert onto a wire rack to cool completely before frosting.

Basic White Cake
Adapted from The Cake Book


Ingredients:
  • 3 1/4 cups cake flour
  • 1 Tablespoon baking powder
  • 3/4 teaspoon salt
  • 1 cup (2 sticks) unsalted butter, softened
  • 1 1/2 cups sugar
  • 6 large egg whites
  • 2 teaspoons pure vanilla extract
  • 1 1/3 cups milk
Directions:
  1. Position a rack in the center of the oven. Preheat oven to 350 degrees F. Line two muffin tins with cupcake liners (24 cupcakes total).
  2. In a medium mixing bowl, whisk together the flour, baking powder, and salt.
  3. In the bowl of an electric mixer, using the paddle attachment, on medium-high speed, beat the butter until creamy, about 30 seconds. 
  4. Gradually add the sugar. Increase speed to high and beat until light, about 2 minutes.
  5. Reduce speed to low and add egg whites, one at a time, beating well after each addition. Scrape the sides of the bowl as necessary.
  6. Stir in the vanilla.
  7. At low speed, alternating between the flour mixture and the milk, add the flour mixture in 3 additions and the milk in 2 additions. Mix just until incorporated. 
  8. Evenly distribute batter into the 24 cupcake liners. Each liner should be about 2/3 full.
  9. Bake 16-18 minutes or until a tester inserted into the center of the cupcakes comes out clean.
  10. Allow to cool in the pans for 15 minutes then cool completely on wire racks.

Classic Buttercream Icing
Adapted from Savory Sweet Life


Ingredients:
  • 1 cup (2 sticks) unsalted butter, softened
  • 3-4 cups powdered sugar, sifted
  • 1/4 teaspoon table salt
  • 1 Tablespoon vanilla extract
  • 3-4 Tablespoons heavy cream or milk
Directions:
  1. In the bowl of an electric mixer, using the paddle attachment, on medium speed, beat the butter until creamy, about 2 minutes.
  2. Add 3 cups sifted powdered sugar. Place kitchen towel over bowl and mixer and turn mixer on low speed. Wait 30 seconds, remove towel and increase speed to medium.
  3. Add vanilla, salt, and 2 Tablespoons of cream or milk. Beat for 3 minutes.
  4. Turn off mixer and text icing. Adjust to desired consistency as needed. If icing needs to be stiffer, add remaining sugar. If icing needs to be thinner, add remaining cream one Tablespoon at a time mixing thoroughly and testing before each addition.

Monday, September 27, 2010

Daring Bakers September 2010: Decorated Sugar Cookies


For a while now I've been extremely interested in the idea of decorating sugar cookies. I've stalked many cookie blogs. Some of my favorites are been Bridget, Amanda and Marian and there is always fantastic information and tutorials at University of Cookie as well.

A couple months ago, I started acquiring different cookie cutters. I drew up sketches of what I wanted to create and for which people I wanted to send them. But I never quite worked up the courage to create the "masterpieces" I felt I would be able to create.

So I was more than excited to find that the Daring Bakers challenge host had read my mind yet again...

The September 2010 Daring Bakers’ challenge was hosted by Mandy of “What the Fruitcake?!” Mandy challenged everyone to make Decorated Sugar Cookies based on recipes from Peggy Porschen and The Joy of Baking.

Because of Many I was able to push past my fear of decorated sugar cookies and channel my inner Bridget.

We were supposed to decorate the cookies based on what September means to us. Here's what September has meant to me this year:


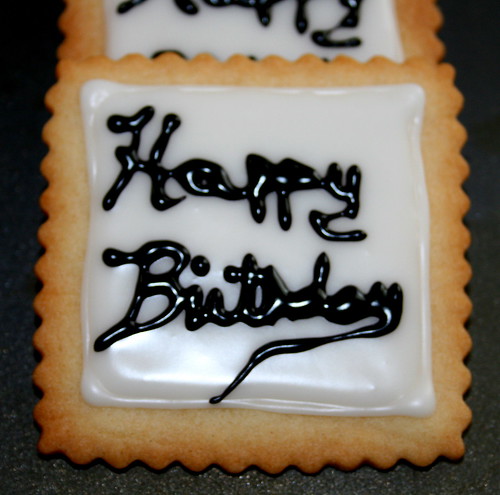
A friend of mine celebrated her 30th birthday on the 22nd and she invited me over for a pre-birthday girl's celebration the night before. I wanted to do something special for her so I made her these cookies. Little Butt picked the pink for the numbers.

Though they didn't come out exactly like I wanted (they aren't the best or prettiest) I was still excited to give them to her.


Living in New York for 5 years has made me associate September with apples. September is when all the apple festivals were held and I just automatically think of apples when I think of September now. My friend Elsa has a business called Gold & Apel so I wanted to make my apples golden in honor of her (actually, I wanted to send her these golden apple cookies for her birthday but she took off on some crazy European tour instead...I couldn't compete with that!).


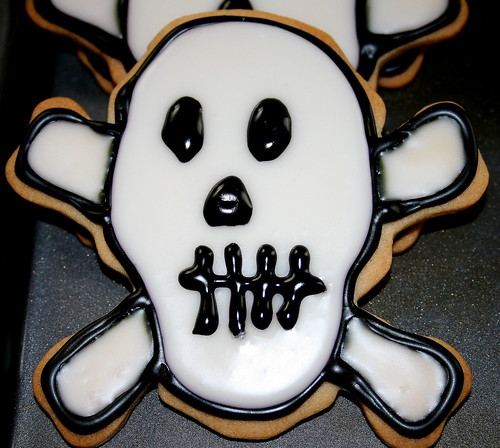
And finally...September to me means National Talk Like a Pirate Day. And no Pirate Day is complete without Skull and Crossbones cookies!! These were super fun to make!

Though my cookies aren't perfect and are nowhere near the professional level of the ladies I mentioned above, I'm quite happy with my creations. They were super fun to make. The only downside is that my back ached like crazy when I was finished. I went to bed with a Soma in my belly that night that's for sure.

I definitely think that with a little practice I could get better at these and would be much happier with the results. But not too shabby for a first timer, in my biased opinion anyway.

Thanks to Many for choosing this challenge and forcing me to get with the cookie decorating program. Without her I probably would have continued to procrastinate and never would have discovered how fun these could be.

And now let me show you how I made them:


I started with my ingredients: flour, super fine sugar, butter (unsalted), vanilla and an egg.


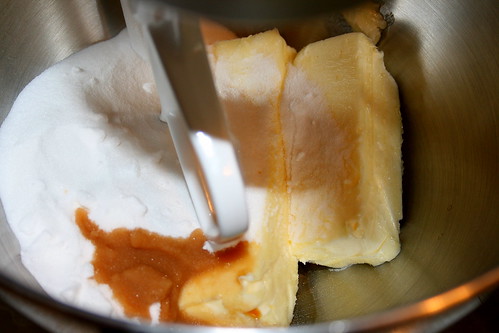
Toss the sugar, butter and vanilla in the mixer...


And cream them all together until smooth.


Add in the flour and mix until you get a non-sticky dough.


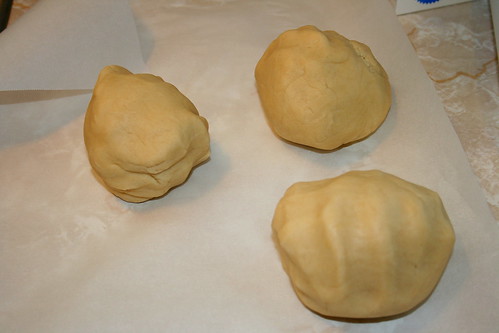
Knead the dough into a large ball.


Then separate the dough into 3 even pieces.


Roll out each portion between 2 sheets of parchment paper and place in the fridge for at least 30 minutes.


Once the dough is chilled, peel off one sheet of the parchment paper.


And use your cutters to cut out shapes. Place the shapes on a parchment lined baking sheet and return to the fridge for another 30 minutes (the refrigeration time reduces the chance of spreading during baking).


After that second chill time, bake the cookies until golden then place on a cooling rack to cool completely.


Then whip up your icing. The recipe I used calls for powdered sugar, milk, light corn syrup and a little lemon juice.

After you make your icing, tint the icing to the colors you are using and go to town. Again, for some great tutorials on making icing for outlines and flooding you can check out University of Cookie.


Finally, decorate your cookies and allow plenty of drying time. Then share and enjoy!!!

To check out all the other fantastic decorated sugar cookies this month, check out the Daring Bakers Blogroll!

Decorated Sugar Cookies

Basic Sugar Cookie recipe adapted from Peggy Porschen

Ingredients:
  • ½ cup + 6 Tbsp Unsalted Butter, at room temperature
  • 3 cups + 3 Tbsp All Purpose Flour, sifted
  • 1 cup Caster Sugar / Superfine Sugar
  • 1 Large Egg, lightly beaten
  • 1 tsp Vanilla Extract / Or seeds from 1 vanilla bean
Directions:
  1. Cream together the butter, sugar and any flavorings you’re using. Beat until just becoming creamy in texture. (Tip: Don’t over mix otherwise you’ll incorporate too much air and the cookies will spread during baking, losing their shape.) 
  2. Beat in the egg until well combined, make sure to scrape down the sides of the bowl.
  3. Add the sifted flour and mix on low until a non sticky dough forms. (Tip: If you don’t have a stand mixer you may find it easier to switch to dough hooks at this stage to avoid flour flying everywhere.)
  4. Knead into a ball and divide into 2 or 3 pieces.
  5. Roll out each portion between parchment paper to a thickness of about 5mm/1/5 inch (0.2 inch)
  6. Refrigerate for a minimum of 30mins. (Tip: Recipes commonly just wrap the whole ball of dough in clingwrap and then refrigerate it for an hour or overnight, but by rolling the dough between parchment, this shortens the chilling time and then it’s also been rolled out while still soft making it easier and quicker.)
  7. Once chilled, peel off parchment and place dough on a lightly floured surface.
  8. Cut out shapes with cookie cutters or a sharp knife.
  9. Arrange shapes on parchment lined baking sheets and refrigerate for another 30mins to an hour. (Tip: It’s very important you chill them again otherwise they’ll spread while baking.) 
  10. Re-roll scraps and follow the above process until all scraps are used up.
  11. Preheat oven to 180°C (160°C Fan Assisted) / 350°F / Gas Mark 4.
  12. Bake until golden around the edges, about 8-15mins depending on the size of the cookies. (Tip: Bake same sized cookies together otherwise mixing smaller with larger cookies could result in some cookies being baked before others are done.) (Tip: Rotate baking sheets half way through baking if your oven bakes unevenly.)
  13. Leave to cool on cooling racks.
  14. Once completely cooled, decorate as desired. (Tip: If wrapped in tinfoil/cling wrap or kept in airtight containers in a cool place, un-decorated cookies can last up to a month.)
Sugar Cookie Icing adapted from I am Baker 

Ingredients:
  • 1 cup powder sugar (confectioners sugar)
  • 1 tablespoon milk
  • 1 tablespoon light corn syrup
  • 1/2 teaspoon lemon emulsion (original recipe calls for 1 drop lemon juice)
Directions:
  1. Sift the powdered sugar into mixing bowl.
  2. Add milk, corn syrup, and lemon emulsion or lemon juice.
  3. Mix everything together. If too dry, add milk a drop at a time until desired consistency.
  4. Tint to desired colors and decorate cookies as desired.
Related Posts with Thumbnails