


Did you know that carbs make the world go 'round?
Well...they make my world go 'round anyway.
I'm not sure I've ever met a carb I didn't like.
That age old saying comes to mind... "If you like carbs so much, why don't you marry them?"
Okay. Maybe it's not an age old saying. I first heard it from PeeWee Herman on PeeWee's Playhouse but that's old enough for me.
I would definitely marry carbs if I could. Like that guy on the commercial who married bacon. I just don't know how that would go for carbs. Or myself really. It would be a volatile relationship.
Anyway. Enough about that.
Let's talk bread. One of the greatest carbs out there.
Many times I have tried my hand at making bread. I have made rosemary olive oil bread, French bread loaves, no fuss focaccia, and my first ever bread baking experience, the French baguette. I've always found my bread skills to be a bit lacking.
I have the desire to produce beautiful loaves of bread. I want the outer shell to crackle as you gently squeeze it. I want the inside to be soft and chewy brought to perfection with the generous smear of butter. But alas, it hasn't been meant to be. Until...
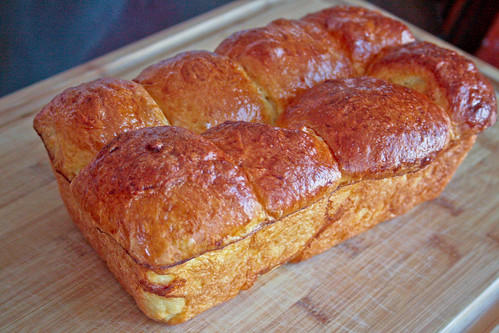
Until I made this loaf of brioche.
I had read reviews of different brioche recipes in the past. I must admit, I was heartily intimidated by the lengthy process of this delicate bread. However, I recently made a batch of chocolate chip cookie dough bread pudding that I believed would only be enriched by using homemade brioche.
So I set about researching recipes to find the perfect one. My Google-fu was strong that day and I ran across a recipe that boasted authenticity and simplicity. Could it be? Was this the one? The reviews for the recipe increased my excitement. So I pushed up my sleeves and delved into the process.
Though it took me the better part of a day to make these loaves, I was extremely pleased with the outcome. The dough was smooth and breathtaking. It's beauty could not be denied. Once baked, the loaves were a delicious golden brown and light as air.
As I mentioned before, I made the bread to be used in another recipe. Well...that didn't happen. My family and I couldn't keep our greedy little fingers away from the slices of this delectable bread. Needless to say, it didn't last long enough to become dried out for a bread pudding recipe.
Whether making this bread with the intention of using in another recipe or sharing with loved ones, this recipe is definitely a keeper. The directions were thorough and easy to follow. And the results are easy enough for an novice like me to attain, meaning anyone can make fantastic bread using this recipe!
Let's bake!
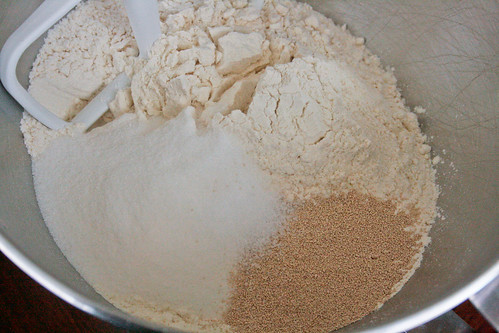
In a mixing bowl, mix together the flour, sugar, and yeast.
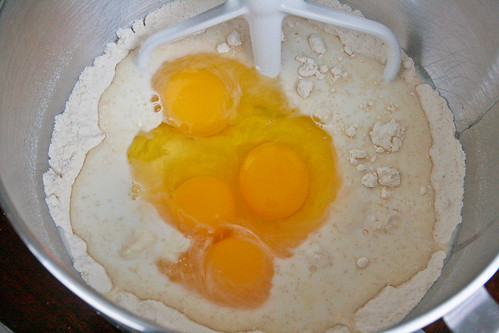
Add in the milk and some eggs.

As the ingredients start to come together, switch to the hook attachment. Beat about 4 minutes then scrape the bowl and hook.

Beat another 4 minutes then scrape the hook.
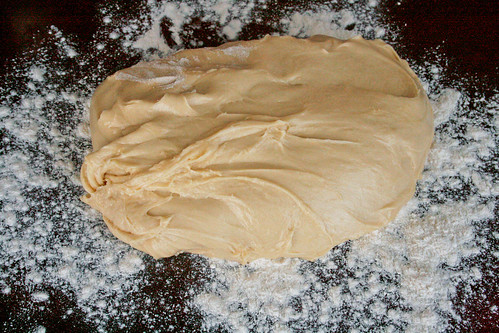
Turn dough out onto a lightly floured surface. Knead a few times Then form into a ball:

Fold the dough into the center from the top...

Right side...
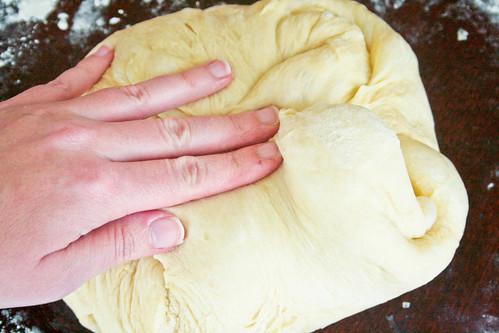
Bottom...

And left side.
Flip it over and tuck the bottom into itself as you turn it and smooth out the top.

Place the dough, folded side down, into a clean, large bowl. Cover loosely with plastic wrap and let rise for an hour.
Turn it out onto a lightly floured work surface, smooth side down, and repeat the forming it into a ball process.
Place back into the bowl, smooth side up, and let rise another hour or overnight in the fridge.

I tried to put mine in the fridge overnight but after about an hour and a half it looked like this so I finished it up that same day.
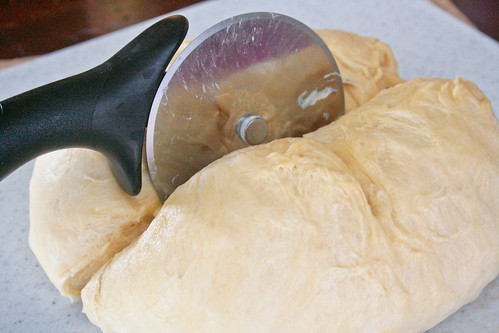
Turn the dough out onto a clean work surface. Fold the top, right, bottom, and left into the center of the dough and cut it into 2 even pieces. Cover one half with plastic wrap as you work with the other.
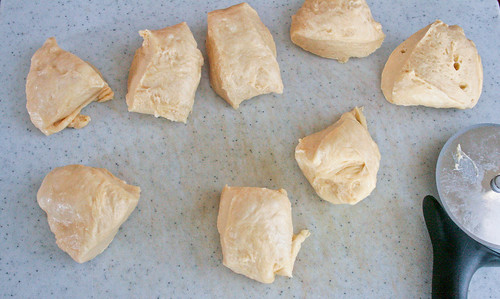
Cut each half into 8 equal pieces, 16 total. Form each little piece into a tight little ball.

Place the dough balls into some loaf pans, cover loosely with plastic wrap, and let rise another hour.

Once risen, gently brush on some egg wash then pop into the oven.
The bread should be a dark golden brown when done. Let it cool in the pan for about 25 minutes before removing.
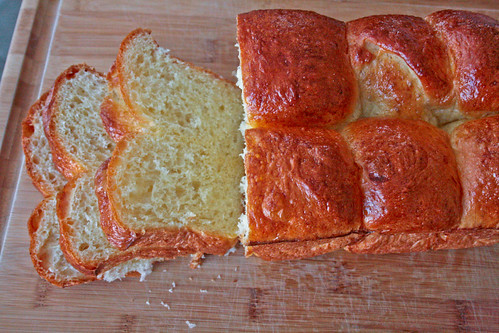
Slice, serve, and enjoy!!
PS. If you are feeling generous, eat one loaf and share the other with a friend.
Brioche
Adapted from Fine Cooking
Printer Friendly Version
Ingredients:
- 4 cups unbleached all purpose flour
- 1/3 cup granulated sugar
- 4 1/2 teaspoons active dry yeast
- 2 teaspoons salt, plus a pinch for egg wash
- 6 large eggs plus one large egg yolk, divided
- 1/2 cup milk, at room temperature
- 1 cup unsalted butter, slightly softened, cut into 16 pieces
Directions:
- In the bowl of an electric mixer, using the paddle attachment, on low speed, mix the flour, sugar, yeast, and salt until well combined.
- Add for of the eggs and the milk, mix to combine.
- When the dough begins to stick together (before all ingredients are combined), switch from the paddle attachment to the dough hook. Increase the speed to medium and mix for 2 minutes.
- Using a plastic dough scraper or strong rubber spatula, scrape the bowl and dough hook then continue to mix about 2 minutes more, until the dough becomes firm and elastic. The dough will continue to stick to the hook, scrape the dough off the hook again.
- Reduce the mixer speed to medium-low and add half the butter pieces, a few at a time.
- Scrape the bowl and dough hook again then knead the dough by hand a few times to fully incorporate the butter.
- Replace the dough hook, turn the mixer on medium low speed, and add the remaining butter, a few pieces at a time.
- Once the butter has been added and incorporated, increase the mixer speed to medium and mix for 4 minutes. Scrape bowl and dough hook.
- Mix 4 minutes more. Dough should be smooth, soft, and shiny and should slap the sides of the bowl as it mixes.
- Scrape the dough onto a lightly floured (too much flour will toughen the dough) work surface. Knead by hand a few times then form into a ball by folding the edges from the top, right side, bottom, then left side. Turn the dough over and tuck the bottom into itself as you turn the ball of dough and smooth the top.
- Place dough, fold side down, into a clean large bowl. Cover loosely with plastic wrap and let dough rise in a warm area for about an hour, the dough should double in size.
- Turn the dough out of the bowl, smooth side down, onto a lightly floured work surface and repeat step 10 above, folding the dough and working it into a smooth ball.
- Place the dough, smooth side up, back into the bowl and cover tightly with plastic wrap. Allow to rise another hour, or place in the refrigerator overnight. Dough should double in size.
- Butter two 9.25x5.25x2.75 inch loaf pans (I used butter flavored cooking spray).
- Turn the dough out of the bowl, smooth side down, onto a clean work surface.
- Form the dough into a ball by folding it into the middle from the top, right, bottom, and left. Cut the dough into 2 equal parts. Wrap one in plastic wrap while working with the other.
- Cut each dough half into 8 equal pieces, 16 total. Roll each piece of dough into a tight ball.
- Arrange balls of dough into 2 rows of four pieces into each of the prepared loaf pans.
- Cover loosely with plastic wrap and allow to rise about 1 hour. Dough should be almost doubled in size and should spring back when lightly poked with a finger.
- Halfway into the rise time, position a rack in the center of the oven and preheat to 375 degrees F.
- In a small bowl, beat together the remaining 2 eggs, 1 egg yolk, and a pinch of salt.
- Gently brush the tops of the dough with the egg wash being careful not to let the egg wash drip into the pan.
- Bake loaves for about 25 minutes or until they reach an internal temperature of 190 degrees F. Tops should be dark golden brown and edges should be golden in color.
- Allow to cool in the pan on a wire rack for 25 minutes.
- Remove loaves from pan.
- Slice, serve, and enjoy!
