Thursday, April 28, 2011

Easy Chocolate Tart with Pistachio with Me, My Food and I

Hi all!!


Do you miss me yet??


Well...things are going pretty slow around here. Little Butt and I have been sick for the last few days. We are fighting hard to get over it but it doesn't make it easy to unpack boxes when I have to stop every other minute to blow my nose. 


Even if you are missing me now, once you read today's post you won't even remember my name! LOL!!


Today I present to you: Michael from Me, My Food and I


I discovered Michael when he guest posted for Chef Dennis and I have never looked back. Michael is one of those kind and genuine people that you count yourself lucky to know. I'm so glad I've been able to get to know him better through our blogs and emails. 


Once you read this post you will understand my love and adoration for this fellow food blogger. And once you are done here, please jump over to his blog to say hi. 


Thanks for this delicious treat Michael!!! Give me a couple months and I will hop across the pond to have a chocolate martini with you...as long as you have one of these tarts waiting as well!


Hello readers of Jolts & Jollies! My name is Michael Toa. I am 23 and I live in Sunderland, UK. Like you, I also know and completely understand: there are times when only chocolate will do. In my life, I can only think of a few situations that cannot be conquered with chocolate. When I am down, a plateful of chocolate chips cookies and a glass of cold chocolate milk never fail to cheer me up; when I am feeling celebratory with friends, all I can think about is my flourless chocolate cake piled high with cream and berries; in a moment when I want to find calm, I turn to my favourite bar of dark chocolate; when I need to bribe work colleagues, I bake brownies; my chocolate mousse with Frangelico (hazelnut liquor) and raspberries creates the perfect mood for a romantic dinner date, and when I want to indulge, it’s got to be a chocolate tart...

Chocolate tart and I had a terribly flaky start, but I can assure you, we are now solid. I still often dread the thought of making pastry which sometimes can be a bit tricky. One day it occurred to me that chocolate tart doesn’t have to have a pastry base; I could also make it with a biscuit base which is much, much easier.

So, this is my stress-free, no-bake version of the good old chocolate tart. The tart is best when made in advance to give both the base and the filling time to set. It looks rather elegant for an afternoon tea or a dinner party. Just make sure you save an extra slice for yourself for moment of self-spoiling later... dark, crumbly, buttery base and creamy, velvety, chocolate mascarpone filling with crunchy pistachios. Who could resist? Not me.

I use bourbon biscuits here, but there’s nothing to stop you to use other chocolate crème filled sandwich cookies, like Oreos. You can also as easily alter the flavour here, both in the base and in the filling by adding your favourite pairings with chocolate, like orange zest, coffee or berries.

Feel free to use all dark chocolate if you’re feeling very sophisticated; or all milk chocolate if you fancy something really sweet, but I find combining the two chocolates together create such beautiful balance of flavours. Though I also think that’s just because I cannot decide and I am passionately greedy.

At last but not least, I also know there are times when only certain concoctions will do... but let’s keep this for some other time... chocolate martini anyone?


Easy Chocolate Tart with Pistachio
Serves 8 - 10

For the base
300 g bourbon biscuits
75 g unsalted butter, at room temperature
50 g good-quality dark chocolate, chopped

For the filling
250 g mascarpone cheese, at room temperature
4 tablespoons of caster sugar
100 g good-quality dark chocolate
50 g good-quality milk chocolate
300 ml double/heavy cream
Crème de cocoa blanc (white chocolate liquor), optional
Handful of pistachio nuts, coarsely chopped

1 loose bottomed 10 inch fluted tart tin, about 2 inches deep

In a food processor, process the biscuits, chopped dark chocolate and butter until they form a crumb mixture. Press into a high-sided tart tin, with your hands or the back of a spoon, making a smooth base and sides. Put into the fridge to chill and harden.

In the meantime, melt the chocolates in either a double boiler or microwave and set aside to cool a bit. In another bowl, whisk the mascarpone cheese with 2 tablespoons of the sugar. You can easily whisk by hand, but I use a hand mixer because I’ll be using it again later to whip the cream. Add the slightly cooled pool of melted chocolate to the mascarpone and mix well.

In another bowl, whip the cream with another 2 tablespoons of sugar and a good splash of crème de cocoa blanc, if using, until it starts to hold soft peaks. Fold the cream into the chocolatey mascarpone mixture to make a smooth mixture. The filling should be rather thick but still soft.

Spread the filling into the chilled base, swirling it about with palette knife or spatula to create an even surface, then put the tart back in the fridge, covered with cling to chill for at least 4 hours, but preferable overnight.
Take the tart out of the fridge for half an hour before serving and sprinkle the chopped pistachios on top of the tart.

Sunday, April 24, 2011

Springy Chocolate Birds' Nests with Willow Bird Baking

Woohoo!!! I'm in Texas! 


The move went fairly well...unless you consider the whole not being able to find the U-Haul until the last minute and finding out The Hubble's car had to go into the shop for a $400 part 2 days before we were supposed to leave "well." But hey...we all made it in one piece and nothing seems to be broken (so far). 


While I'm busy unpacking the towers of boxes surrounding us, my dearest Julie was kind enough to share one of her creative recipes with us. Julie is beyond amazing and has inspired me so much! From homemade croissants to 7 pound cheesecakes, this lady makes me strive for greatness! So after you check out this adorable cupcake topper, make sure you run over to Julie's blog and check her out (as if you don't hang on her every word already).


Thanks again Julie!!! And if you asked The Hubble, he would tell you to take a bunch of my shoes...but I'm reluctant to part with them...seeing as how they are super cute. ;-)


This is Julie from Willow Bird Baking, stepping into Maranda's glamorous shoes for a moment to bring you a guest post. And what an honor to be asked to step into these shoes! (No, seriously, they're really cute shoes. Maranda, can I have these?)

Anyway, she's just moved from the wintery middle-of-nowhere to a land of perpetual summer, so I thought I'd bring a little bit of spring to Jolts & Jollies.


These birds' nests are a fun, sweet way to do it. They're the easiest no-bake cookies this side o' the Lone Star state (and probably on the other side, too), but are adorable when they're finished. Making birds' nests is also a great project for little hands to help with once the chocolate has cooled a bit.

You can eat these as cookies, but as you can see, I used mine as cupcake toppers for some springy cupcakes. They would also be adorable on top of a big cake.


To make about 7 of these sweet nests, you'll need:

3/4 cup chocolate chips
1 1/2 cups chow mein noodles
candy eggs (I love the malted chocolate ones!)
parchment paper or a silicone mat

Once you have your materials, melt your chocolate chips according to directions on the package, stirring as you go. Add the chow mein noodles to the chocolate and gently stir to coat. Make little 1/4 cup-ish piles of noodles on your parchment paper or silicone mat.

Let the chocolate cool for just a few minutes before molding it (while still warm and pliable) into a nest-like shape. Allow to harden fully (I stuck mine in the fridge for a few minutes) and decorate with candy eggs. Eat as cookies, or use these to top cupcakes!

Thursday, April 21, 2011

Ginger Lime Poundcake


I'm scheduling this post ahead of time because I'm just so dang excited about this cake and I didn't want you to miss it!

At this point, we should be on our last leg to Texas. We will hopefully be in our new house tonight (cross your fingers for us!!).

This month, for the cake slice bakers, the group chose the cold-oven cream cheese pound cake.

The original recipe called for lemon zest. But me being me (and being preggo with crazy taste buds) decided that this cake sounded better with lime. I mean, come on...ginger lime. Say it with me: ginger. lime. There ya go!

Speaking of being preggo...have you heard the news?? Check out THIS POST to find out Baby N's gender! But finish reading about this cake first!

Now, when I told my Older Sister what I wanted to do, she basically called me crazy (maybe not in so many words but I definitely heard it in her voice).

But I just couldn't get over the idea of ginger and lime in a pound cake!

I bought fresh ginger for this cake as well, but didn't end up using it. Ground ginger is one of my favorite little bottles to pull out of my spice cabinet. There's just something about that sweet, yet tangy, yet fresh flavor that I just can't get over. I tend to over do it with the ground ginger in my Asian dishes as well.

I think my love affair with ground ginger just might rival that of my love for garlic salt...but maybe not. LOL!

I have made this cake twice so far. I made some adjustments the second time that just blew away me and my guests (meaning, I added a bit more lime juice than I did the first time).

Honestly, this cake is shocking. It is heavy. Yes...I said heavy. But only when you hold it in your hand. When you take a bite, the crumb is so light and fluffy, you would never know it was a dense pound cake.

The lime in this cake definitely brings out everything that is beautiful about ginger.

This cake is a contradiction in and of itself. It is light and fluffy but heavy. The flavors are bold and intense while still being subtle and unassuming.

This cake will probably go down in history as being one of my favorites...EVER!

And I truly cannot wait to make it again.

Oh, and I have to say, when I made it with the glaze, I only used 1/2 a cup of powdered sugar and 2 Tablespoons of lime juice. But the consensus was that the cake could definitely use more glaze. I have altered that in the below recipe.

I hope you make this cake. It is a perfect Spring and Summer cake. It is gorgeous and delicious. Plan this one for your next picnic. Please????

Here's how you can have it in your kitchen as well:


Grab your ingredients: cake flour, cream cheese, butter, salt, sugar, vanilla, lime, eggs and ground ginger.


Throw the flour, baking powder, salt and ginger in a bowl and give it a mix.


Cream together the butter, cream cheese and sugar until fluffy, about 3 minutes.


Add the eggs, one at a time and scrape down the sides of the bowl after each addition.


Mix in the vanilla...


And the lime juice and zest.


Now add the flour mixture, 1/2 cup at a time. Scrape down the sides of the bowl after each addition. After the last addition, beat for 30 seconds.


Pour it into a prepared Bundt pan.


Bake it up until golden brown and a toothpick inserted in the center comes out clean. Let it cool in the pan for 15 minutes...


Then invert it onto a cooling rack. Isn't it pretty?!?!? Let it cool completely.

PS. This is the very first cake that I made in my brand new Nordicware Anniversary Bundt pan. The pan is just stunning as are the cakes it makes!


And if you are so inclined, whip up a glaze of powdered sugar and lime juice. Drizzle it over the top of your cake.


Then slice this puppy up, serve it and enjoy!!!

Ginger Lime Pound Cake
Adapted from Cake Keeper Cakes by Lauren Chattman

Printer Friendly Version

Ingredients:

For the cake

  • 3 cups cake flour
  • 1 1/2 teaspoons baking powder
  • 1 teaspoon salt
  • 1 1/2 teaspoons ground ginger
  • 1 cup (2 sticks) unsalted butter, softened
  • 8 ounces cream cheese, softened
  • 2 1/2 cups sugar
  • 6 eggs, room temperature
  • 1 Tablespoon pure vanilla extract
  • 1 Tablespoon grated lime zest
  • 1 Tablespoon lime juice
For the glaze
  • 1 cup powdered sugar
  • 3-4 Tablespoons lime juice (depending on desired thickness)
Directions:
  1. Adjust the oven rack the the lower-middle position. Grease a 12-15 cup Bundt pan with baker's spray.
  2. Combine flour, baking powder, salt and ground ginger in a medium mixing bowl.
  3. Cream together the butter, cream cheese and sugar in a large mixing bowl with an electric mixer on medium-high speed until fluffy, about 3 minutes. Scrape down sides of bowl as necessary.
  4. With the mixer on medium speed, add the eggs, one at a time, scraping down the sides of the bowl after each addition.
  5. Beat in the vanilla, lime zest and lime juice.
  6. Turn the mixer to low speed and add the flour mixture, 1/2 cup at a time, scraping down sides of bowl after each addition. After last addition, mix for 30 seconds on medium speed.
  7. Place the cake in a cold oven, Turn the oven on to 325 degrees F and bake, without opening the oven door, until the cake is a golden brown and a toothpick inserted int he center comes out clean, 65 to 80 minutes.
  8. Once the cake is completely cool, make the glaze by mixing the powdered sugar and lime juice to the desired consistency. Add more sugar for thicker glaze or more juice for thinner glaze. Pour the glaze over the cake so it spills over the edges of the cake.
  9. Slice, serve and enjoy!

Monday, April 18, 2011

Guest Post: Baking and Creating with Avril

This week we are packing up the U-Haul and heading down to Texas! I'm so excited to finally be taking the next step in our lives/The Hubble's career. That being said, I've asked a few bloggers to help me out and keep you all drooling while I'm taking these steps.

The first blogger I have to present to you all is the lovely Avril! Avril is just amazing. She always has fabulous treats on her blog. AND she had a new baby recently! So share some lovin' for Avril and don't forget to head over and check out her blog after you check out this  dessert she has for us today. 

I'm seriously going to need a pan of these as soon as I unpack my forks!


Hello!  My name is Avril and I have a blog called Baking and Creating with Avril.  I started this blog a little over a year ago when I found myself addicted to surfing all the amazing food blogs out there in blog land.  I have always had a love and passion for food - making it, creating it and serving it to those that I love and adore.  I find myself (unfortunately for my waist line) radiating towards recipes that are baked goodies. Any type of recipe that is for a cake, cookie, bar, brownie or pie makes my eyes light up with happiness.  Crazy I know!  But I am almost 100% sure that there are many of you like me in the same boat....the "Dessert Boat" of life I will call it.

I was absolutely honored that Maranda asked me to be a guest blogger for her fabulous blog.  I have met so many wonderful, wonderful fellow bloggers through my journey as a food blogger.  I consider them my friends and companions even though many (if not ALL) of the amazing people that I've met in the past year or so through my blog I have yet to actually meet in person.  My dream is that one day I will have the opportunity to meet them in person.  :-)

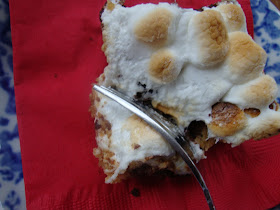
Today I will be sharing with you a lovely brownie recipe that I found on another food blog called, Melissa's Cuisine.  This baked treat is called Marshmallow Peanut Butter Brownies....scrumptious!


These brownies are to die for d'lish!  Very easy to put together and just perfect for this up and coming season of BBQ's as it has a fun layer of marshmallows lightly roasted ontop.  The recipe uses a box brownie mix but of course you can substitute your favorite "made from scratch" brownie recipe in place of the box mix if you so wish.

Marshmallow Peanut Butter Brownies
(recipe from Melissa's Cuisine - such a great source of yummy recipes!)
Brownie Layer Ingredients:

1 box brownie mix (9x13 size)

1/4 cup oil

1/4 water

2 eggs

Peanut Butter Layer Ingredients:

3/4 cup sugar

1/2 cup peanut butter

1/4 cup flour

2 eggs

Topping:

1 cup mini marshmallows

Directions:

1. Grease a 9x13 pan.  Preheat oven to 350 degrees F.

2. In a medium bowl combine brownie mix, oil, water and eggs. Pour batter into prepared 9x13 pan.

3. Next in a small bowl combine sugar, PB, flour and eggs.  Mix all together until fluffy...about 2 minutes.

4. Drop PB mixture onto brownie batter by the spoonfuls.  With a butter knife gently swirl PB dollops into brownie bater.  Place in oven and bake for 40 minutes, or until brownie is done.

5. Cool brownie for 10 minutes and then carefully sprinkle mini marshmallows ontop of baked brownie.  Turn broiler on and place pan of brownies under it for just about 1 minute to gently toast marshmallow layer - WATCH VERY CAREFULLY so as to make sure that marshmallows do NOT burn.

6. Cool and then cut.  A good tip that Melissa suggested for cutting the brownies is to wet the knife with water before cutting into brownies, it will keep the marshmallows from sticking to the knife.

Of course then you may have to do the same with your fork if you choose to eat the brownies with a fork......


Such a yummy treat!


Enjoy....and Happy Marshmallow Peanut Butter Brownie Baking! 


Friday, April 15, 2011

Buffalo Turkey Sandwich (With Ranch)


If you remember, on Monday, I mentioned how full our freezer and pantry were.

We've been making some really great progress in clearing out that stuff...though not nearly enough progress!

I really like to shop at Sam's. And that whole concept of leaving within two months does not deter me from stocking up.

I think it stems from growing up in a household of about 9 or 10 people.

We always needed to stock up!

While at Sam's, we tend to grab a 3 pack of turkey deli meat. I usually make lunch or breakfast sandwiches and sometimes wraps with this lunch meat.

However, one day, The Hubble came home for lunch with some hoagie rolls, shredded lettuce and provolone cheese. He said he "wanted to try something."

I guess he had been to a sandwich place at the PX and watched them make his buffalo chicken sandwich. He figured, why pay $9 for one sandwich when he could make a bunch for the same price!

So when we looked in the freezer and saw that 3 pack of meat and thought about our looming deadline, we decided it was sandwich time!

Seriously, this sandwich is SO good.

I actually never liked buffalo wings...until I got to NY that is. See...down South, I realize, they make their buffalo wings with Tabasco. Yuck! I do NOT like Tabasco.

However, New York introduced me to my new love...Frank's Red Hot. And my oh my does Frank do buffalo right!

Here's a funny little story...when we moved to New York we kept reading on menus that buffalo wings were served with Blue Cheese dressing. Neither myself nor The Hubble like Blue Cheese. Being true Southerners, we asked for Ranch instead of Blue Cheese every time. And every time, the server would look at us like we each had 2 heads and mention that we must not be "from around there."

I'm sorry...are my [Southern] roots showing???

Anyway.

Make this sandwich.

Make this sandwich today.

And smother it in Ranch! (or Blue Cheese if you're into that sort of thing)

Okay, okay. Enough with the blabbering. Let's get cooking!


Ingredients: deli sliced turkey meat, Frank's Red Hot, provolone cheese, butter, tomato, shredded lettuce, hoagie rolls and Ranch!


Toss your turkey and butter into a large skillet over medium-high heat.


Go ahead and slice your tomato quick while you let that meat cook. I like to slice mine then cut it in half for the long hoagie roll.


Cook the meat until the turkey is heated through and slightly browned and the butter is melted. Make sure you  coat the turkey well with the butter.


Now pour on the Frank's and stir it all up.


Top with the provolone slices and allow to melt.


Separate into two (somewhat), even helpings. Then complain to The Hubble that you feel as though you are being shafted and one side is bigger than the other.


Then ensure that the bigger portion goes on your roll (I like my roll toasted, The Hubble likes his soft out of the bag).


Top that bad boy with lettuce, tomato and the dressing of your choice...as long as it's Ranch!


Then serve that baby up with some kettle cooked chips and a pickle spear. Enjoy!!!

Buffalo Turkey Sandwich

Printer Friendly Version

Ingredients:

  • 9 ounce package deli sliced turkey breast
  • 2 Tablespoons butter
  • 1/4 cup Frank's Red Hot Sauce
  • 4 slices provolone cheese
  • 2 hoagie/sub rolls
  • lettuce
  • tomato, sliced
  • Ranch (or Blue Cheese) dressing
Directions:
  1. Place turkey and butter in large skillet on medium-high heat until butter melts and turkey heats through and browns slightly; about 5-8 minutes, stirring constantly to fully coat turkey with butter.
  2. Add Frank's Red Hot, stir to coat. 
  3. Place provolone evenly over the top of the turkey meat, let sit until melted.
  4. Separate meat and cheese mixture into two even servings. Spread evenly over hoagie rolls.
  5. Top with lettuce, tomato and dressing.
  6. Serve with chips and a pickle spear. Enjoy!

Monday, April 11, 2011

Elote (In a Cup)


Before I get into this recipe...I need to tell you. When you are moving in less than 3 weeks...your freezer should definitely NOT look like this:


And your pantry should absolutely look NOTHING like this:


Well....if you really want to get into it. Your pantry should NEVER look like that in the first place.

I mean. It looks like a freaking slob lives in a house with a pantry like that!

And yes, if you notice...there is so much stuff that it doesn't even all FIT in the pantry and has to reside on TOP of the pantry. Ugh!

And let's not even talk about how the freezer is so full that the sorbet has to hang out in the ice bin.

Yeah...

But!

We've been making good progress in the last week. I took those pictures about a week ago. Now we have a little under 2 weeks to go until we move and the freezer looks MUCH different now.

We just won't talk about that pantry.

So, this week, you will be getting a couple recipes that we have enjoyed because of our ever pressing need to clear out that freezer and chucking as little as possible.

Not to say that we wouldn't have enjoyed these dishes anyway...we just rushed along the process a bit.

And there's NOTHING wrong with that. ;-)

So...on to the recipe!

The first time I tried elote (pronounced EEE-low-tay) was at The Hubble's parent's church Summer festival. The Hubble's dad was in charge of the beer booth so, naturally, we helped sling beer for a couple nights over a weekend.

This was one of the most fun experiences I've ever had. I mean...serving beer to people who are getting increasingly drunk all the while listening to the band play.

Now, let me also mention, this was in El Paso, Texas where Mexican influence reigns king.

So...much of the time, the band was some version of mariachi music. That's fine by me.

At the end of the weekend, all the volunteer staff and church employees grabbed some beer, margaritas and cups of elote and sat around chatting and laughing.

It was fabulous!

I had never tasted anything so delicious in my life as that elote. It was corn in a cup, yes. But it was drenched in this creamy, buttery sauce, cheesy, heavenly sauce. You grab a cup, toss in as much chili powder as you can handle and some lime juice for good measure, grab a spoon and go to town!

When wracking my brain for ideas to use up the stuff in my freezer, I ran across a package of corn on the cob. I thought what better time than now to make my own elote!

I will tell you that I went heavy on the mayo and The Hubble was not thrilled. He claimed that all he could taste was the mayo. I loved the dish and think he's crazy.

However, I am pregnant and my taste buds could very well be wonky. Therefore, in the recipe I indicated a smaller and larger measurement for the mayo. You can decide from there which way you want to go.

I will also say that I like heat. When I'm not trying to convince myself I should have been born Italian, I'm telling others that I'm really an honorary Mexican. I mean...I married a half Puerto Rican, half Mexican man...shouldn't that count for something???

Anyway...to make a long story even longer by now...if you don't like too much heat, I would scale back on the chili powder and cayenne pepper. Maybe half them??

Either way, any way you make this is going to be amazing. Trust me. You know...or don't. Like I said, my taste buds could just be wonky.

But did I mention The Hubble doesn't like cheese??? I'm not really sure he can be trusted ya know??

On to the recipe!


Gather your ingredients: corn, mayo, butter, chili powder, cayenne pepper, ground cumin, lime juice and cotija (or parmesan) cheese.


Melt your butter in a medium saucepan over medium high heat.


Mix in the corn until it's well coated with the butter.


Mix in the mayo until well incorporated. Let it start bubbling.


Toss in your spices. Mmmm...spices. Mix them all in.


Then dump in your cheese and stir until it's all melty.


Now let that bad boy boil. Stir it occasionally. But you want those fats from the butter and mayo to separate and create this delicious sauce. Once you have that...you are golden!


Serve it up in a cup with a spoon! Toss in more cheese (and or spice) if desired. And enjoy!


Elote (In a Cup)

Printer Friendly Version

Ingredients:

  • 2 cups whole kernel corn (drained if using canned)
  • 1/2 cup (1 stick) salted butter
  • 1/4-1/2 cup mayo (depending on desired creaminess)
  • 1/8 cup lime juice
  • 1 teaspoon chili powder
  • 1/2 teaspoon cumin
  • 1/2 teaspoon cayenne pepper
  • 1/2 cup crumbled or shredded cojita cheese (can sub parmesan)
Directions:
  1. Grill or heat corn as desired.
  2. Melt butter in medium saucepan on medium high heat.
  3. Add corn and stir to coat well.
  4. Add mayo, mix well. Bring to a boil.
  5. Add lime juice, chili powder, cumin and cayenne pepper. Mix well.
  6. Add cheese, stir until melted.
  7. Bring mixture to a boil. Allow to boil, stirring occasionally, until fats separate and a 'juice' forms; about 5-8 minutes.
  8. Serve in a cup. Add extra cheese, lime or seasonings as desired. Enjoy!

Thursday, April 7, 2011

Ricotta Bruschetta


I have this list....

It's a list of the dishes I have made and are awaiting their turn in the spotlight. You know...they are waiting their turn to be blogged about.

Yes, my dishes feel as though they are famous when I post about them.

Don't yours???

Either way...

I digress.

Back to the list.

When I don't feel as though I have to post something this. very. instant! I consult the list to see what I am going to share with you next. Basically...who gets their 15 minutes of fame.

Yesterday, I couldn't decide what I wanted to share....so I went to twitter.

I asked the people on twitter if they wanted sweet or savory.

The response I received from Jessica was perfect. She said:

"YES to both. And salty, sweet, savory, spicy, and salty."

Don't you love that response???

Do you think there is possibly a dish on my list that could meet all these criteria?

Well...as soon as I read that, I knew just the thing!

This ricotta bruschetta encompasses all these tastes (though maybe not the spicy, but I'll bet you can get creative and fix that!).

This dish is perfectly well rounded. The tomatoes and mint give it the right amount of sweetness. The ciabatta is drizzled with olive oil, grilled and enlivened by the tangy lemon juice and bold oregano flavors. And the ricotta cheese, perfectly seasoned with salt and pepper, rounds out the brightness of the dish just beautifully.

This dish is truly the most amazing combination of sweet, savory, salty, hearty, fresh and light...all at the same time.

Though the recipe calls for fresh mint, I find that a mixture of fresh mint and basil just adds another layer bursting with flavor.

And what's more...this dish is perfect for Spring!

Not too heavy for an evening appetizer...and not too heavy for an afternoon snack.

Serve this on a warm day with a fresh breeze. As you take your first juicy, crispy bite you will feel the world around you come to life with the promises of Spring beauty.

So what are you waiting for...let's get into the kitchen.


Grab up your ingredients: ciabatta (this is supposed to be a loaf, but when you send The Hubble to the store you get ciabatta rolls. Oh well...it's workable), extra virgin olive oil, skim milk ricotta cheese, fresh mint (and basil, if desired), tomatoes, lemon, dried oregano, salt and black pepper.


Start by preparing the bread. Slice the loaf into 1/2 inch thick slices. Drizzle them with the olive oil.


Grab either a grill pan, indoor, gas or charcoal grill and heat it to medium high heat. Grill the ciabatta until golden brown on both sides, about 2-3 minutes per side. Remove from heat and squeeze the lemon juice over  the bread slices. Sprinkle with the dried oregano, salt and pepper.


Now for the topping. Core, seed and dice the tomatoes.


Toss them in a medium bowl with the tomatoes, fresh herbs, salt and pepper.


Gently stir it all up until it is well mixed.


Top the bread with a generous helping of the ricotta topping. Serve and enjoy!!

Ricotta Bruschetta
Slightly adapted from The Food Network

Printer Friendly Version

Ingredients:

For the bread

  • 1 pound ciabatta bread loaf, cut into 1/2 inch thick slices
  • 1/4 cup extra virgin olive oil
  • 1 lemon
  • 1 teaspoon dried oregano
  • salt and freshly ground black pepper
For the topping
  • 1 (15 ounce) container skim milk ricotta cheese
  • 2 large tomatoes, seeded and diced
  • 3 Tablespoons finely chopped fresh mint; plus more for garnish (can sub 1 1/2 Tablespoon basil, if desired)
  • 1/2 teaspoon salt
  • 1/4 teaspoon freshly ground black pepper
Directions:

For the bread
  1. Turn a grill of your choice (grill pan, indoor, gas or charcoal grill) onto medium-high heat.
  2. Drizzle the bread slices with olive oil.
  3. Grill the bread until golden on both sides, about 2-3 minutes on each side.
  4. Remove the bread. Squeeze the lemon juice over the bread slices.
  5. Sprinkle the oregano, salt and pepper over the bread slices.
For the topping
  1. In a medium bowl, combine the ricotta, diced tomato, chopped herbs, salt and pepper.
  2. Gently stir to combine well.
  3. Top the bread with a generous amount of the cheese topping and garnish with excess mint.
  4. Serve and enjoy!!