When I lived in Washington State I fell head over heels in love with Asian food.
I mean, there is a huge Asian community up there so it's not hard to fall under the spell of the deliciousness Asian food has to offer.
One of the things I loved the most was teriyaki.
Let me tell you. NO ONE does teriyaki like they do in Washington State! There is just something about that Seattle style teriyaki sauce that I have not been able to find anywhere else (except after 10 years of searching I found it in a little place called Kee's Teriyaki in El Paso, TX).
My favorite place to get teriyaki was a joint called Happy Teriyaki outside the Ft. Lewis gate. This was my favorite place because not only was the food delicious and they gave you humongous portions for little money, but also because they had DE-LICIOUS tempura!
For years and years I thought it was the carrot that was my favorite tempura...but come to find out recently, it's the sweet potato! LOL!!
When I first read about this month's Daring Cooks challenge, I about jumped for joy!
The February 2011 Daring Cooks’ challenge was hosted by Lisa of Blueberry Girl. She challenged Daring Cooks to make Hiyashi Soba and Tempura. She has various sources for her challenge including japanesefood.about.com, pinkbites.com, and itsybitsyfoodies.com
I got to make tempura??? Seriously?!?!?!
I never would have thought to make this on my own. But I don't know why not! It's actually quite simple, super fun, and it tastes just as amazing (if not better) than what you can get at a restaurant.
And, because I was in charge, I got as much of the dipping sauce as I wanted!
And the cold soba salad was definitely an added bonus to this meal.
Luckily, the weather has been warming up, but I can imagine how delicious this cold soba salad would be on a hot summer day...topped with cucumber and accompanied with a nice cold tea. Mmmmmm....just thinking about this makes me want summer time to hurry up and get here!!
Thanks Lisa, for an awesome challenge this month! Not only did The Hubble and I love it...but Little Butt finally ate carrots and broccoli and even asked for more!!!
As always, if you would like to see how the other Daring Cooks did with this challenge, check out the blog roll.
And if you have fantasies of crispy tempura dipped in sweet juices then look no further than your own kitchen. Let's get started!
For this recipe we were provided with two sauce recipes. One is a traditional dipping sauce, the other is a spicy dipping sauce. I made the spicy dipping sauce for the soba and the traditional sauce for the tempura.
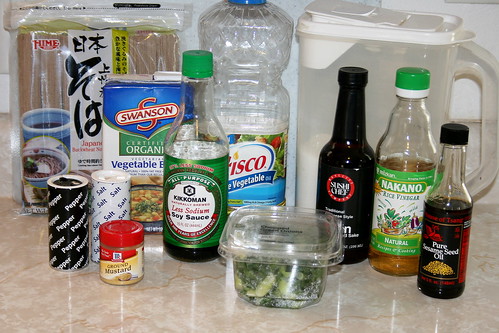
Ingredients for spicy dipping sauce: green onion, soy sauce, rice vinegar, sugar, ground mustard, vegetable oil, sesame oil, sea salt, pepper and water.
Ingredients for traditional dipping sauce: vegetable stock, soy sauce and mirin (sweet rice wine).

Bring the water to a boil. Add the soba noodles, stirring gently to separate.
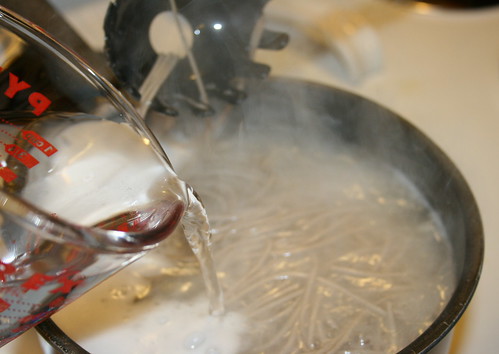
When the water comes back to a boil (after adding the noodles) pour in a cup of cold water. Bring to a boil again then add another cup of cold water. Bring to a boil a third time, check for doneness.
When noodles are done, immediately drain them in a colander and rinse with cold water until the noodles are cool. Set aside until ready to serve.

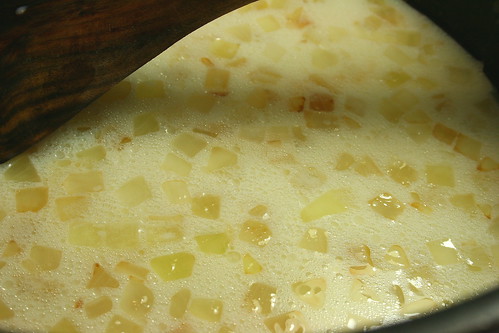
To make the spicy dipping sauce (to serve with the noodles) add the green onion, soy sauce, rice vinegar, sugar, ground mustard, vegetable oil, sesame oil, sea salt and pepper in a covered container and shake it up until the salt dissolves. Add in the water and shake it a bit more to mix in the water. Set aside until ready to serve.
To make the traditional dipping sauce, gently heat the mirin in a saucepan. Add the soy sauce and stock. bring to a boil. Remove from heat to cool. Refrigerate until ready to use.
Now that we have the noodles and our sauces made, it's time to get down to bidness! The tempura!!
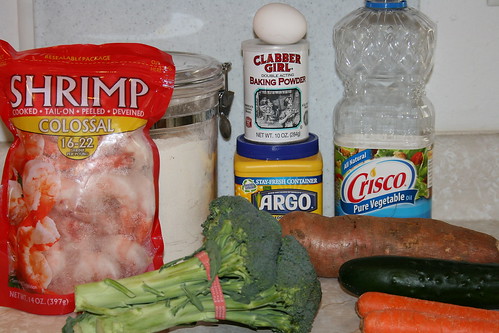
For the batter you need a large egg yolk, ice water, cornstarch, all purpose flour and baking powder. For the cooking you need some vegetable or canola oil and your choice of vegetables and seafood. I chose shrimp, broccoli, carrots, sweet potato and The Hubble requested cucumber.
Go ahead and get your oil heating. You want 320 degrees F for veggies and 340 degrees F for seafood.

Slice up your vegetables into thin slices...or small pieces for the broccoli.

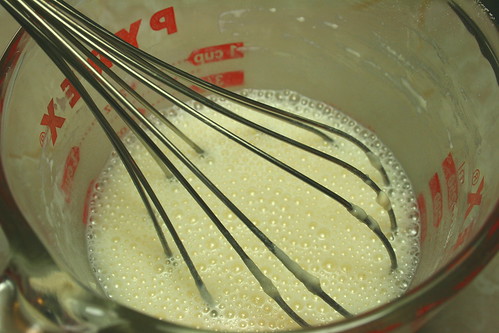
Pour the ice water into a mixing bowl. Gently beat the egg yolk and gradually pour into the ice water. It's really weird to see it suspended in the cold water. Kind of gross too. LOL!! Stir it up with chopsticks to combine.

Dump the flour, cornstarch and baking powder into the water and egg mixture all at once.

Stroke the mixture a few times with your chopsticks until the ingredients are loosely combined. The batter should be runny and lumpy. Place the bowl of batter into an ice water bath to keep cold while you are frying.

Take your vegetables and seafood (starting with the veggie with the least likelihood to leave an odor in the oil. I started with sweet potato) and dredge them through a shallow bowl of flour.
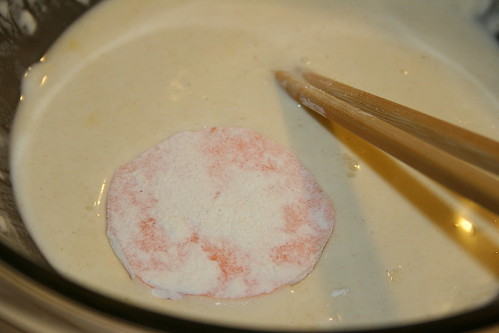
Then dunk into the batter.

Gently slide the pieces into the oil and fry until golden.

Remove the cooked pieces with a slotted spoon and place on a wire rack atop a baking sheet to drain and cool. Continue the process through the rest of your veggies and seafood.
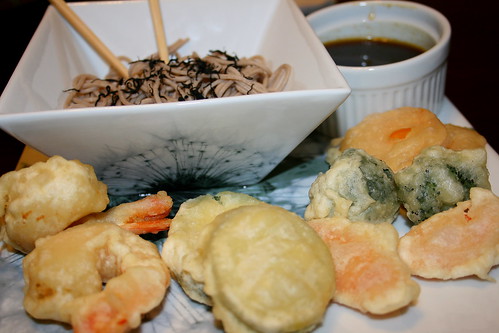
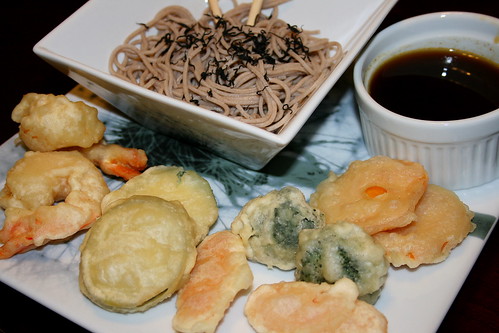
Serve tempura hot with cold soba salad (I topped mine with toasted nori) and your dipping sauces. And don't forget the sake bombs!! Enjoy!!
Tempura and Cold Soba Salad
Retrieved from The Daring Kitchen
Printer Friendly Version
Soba Noodles
Ingredients:
- 2 quarts water + 1-2 cups cold water, separate
- 12 ounces soba (buckwheat) noodles (or other thin Asian noodle)
Directions:
- Heat 2 quarts of water to a boil in a large pot over high heat. Add the noodles a small bundle at a time, stirring gently to separate. When the water returns to a full boil, add 1 cup of cold water. Repeat this twice. When the water returns to a full boil, check the noodles for doneness. You want to cook them until they are firm-tender. Do not overcook them.
- Drain the noodles in a colander and rinse well under cold running water until the noodles are cool. This not only stops the cooking process, but also removes the starch from the noodles. This is an essential part of soba noodle making. Once the noodles are cool, drain them and cover them with a damp kitchen towel and set them aside allowing them to cool completely.
Spicy Dipping Sauce
Ingredients:
- 3/4 cup green onion, chopped
- 6 Tablespoons low-sodium soy sauce
- 4 Tablespoons rice vinegar
- 1 teaspoon granulated sugar
- 1/2 teaspoon ground (dry) mustard
- 2 Tablespoons vegetable oil
- 2 Tablespoons sesame oil (optional)
- 2/3 teaspoon sea salt
- 2/3 teaspoon pepper
- 4 Tablespoons water
Directions:
- Combine green onion, soy sauce, rice vinegar, sugar, ground mustard, vegetable oil, sesame oil, sea salt and pepper in covered container.
- Shake ingredients together until salt dissolves.
- Add water, shake until mixed.
- Set aside until ready to serve.
Common Hiyashi Soba Toppings:
- Thin omelet strips
- Ham
- Boiled chicken breasts
- Cucumber
- Boiled bean sprouts
- Tomatoes
- Toasted nori (Dried Seaweed)
- Green onions
- Wasabi powder
- Finely grated daikon (Japanese radish)
- Beni Shoga (Pickled Ginger)
All toppings should be julienne, finely diced or grated. Prepare and refrigerate covered until needed.
Serving:
Traditionally soba is served on a bamboo basket tray, but if you don’t have these, you can simply serve them on a plate or in a bowl. Divide up the noodles, laying them on your serving dishes. Sprinkle each one with nori. In small side bowl or cup, place 1/2 cup (120 ml) of dipping sauce into each. In separate small side dishes, serve each person a small amount of wasabi, grated daikon, and green onions.
The noodles are eaten by sprinkling the desired garnishes into the dipping sauce and eating the noodles by first dipping them into the sauce. Feel free to slurp away! Oishii!
The noodles are eaten by sprinkling the desired garnishes into the dipping sauce and eating the noodles by first dipping them into the sauce. Feel free to slurp away! Oishii!
Tempura
Ingredients:
- 1 large egg yolk
- 1 cup iced water
- 1/2 cup all purpose flour, plus extra for dredging
- 1/2 cup cornstarch
- 1/2 teaspoon baking powder
- Vegetable or canola oil for frying
- Water bath for keeping tempura batter cold
- Vegetables and seafood of your choice
Directions:
- Place the iced water into a small mixing bowl.
- Lightly beat the egg yolk and gradually pour it into the iced water. Stir (preferably with chopsticks) until well blended.
- Add flour, cornstarch and baking powder all at once.
- Stroke a few times with chopsticks until ingredients are loosely combined. Batter should be runny and lumpy.
- Place bowl of batter in ice water bath to keep cold while frying tempura.
- Heat oil in a large pan or wok. For vegetables, the oil should be 320 degrees F. For seafood, 340 degrees F.
- While oil is heating, prepare your vegetables and seafood.
- Begin by frying the vegetables that leave the least odor in the oil, such as sweet potatoes.
- Dredge the vegetables and seafood through a shallow bowl of flour, then coat in the tempura batter.
- Carefully slip the battered pieces into the hot oil and allow to cook until golden.
- Remove from oil with a slotted spoon and place on a wire rack atop a baking sheet to drain and cool.
- Serve hot with Mentsuyu (recipe follows).
- Enjoy!!
Mentsuyu - Traditional Dipping Sauce
Ingredients:
- 2 cups vegetable stock
- 1/3 cup low-sodium soy sauce
- 1/3 cup mirin (sweet rice wine)
Directions:
- Gently heat mirin in saucepan.
- Add soy sauce and stock. Bring to a boil.
- Remove from heat.
- Refrigerate until ready to serve.